|
|
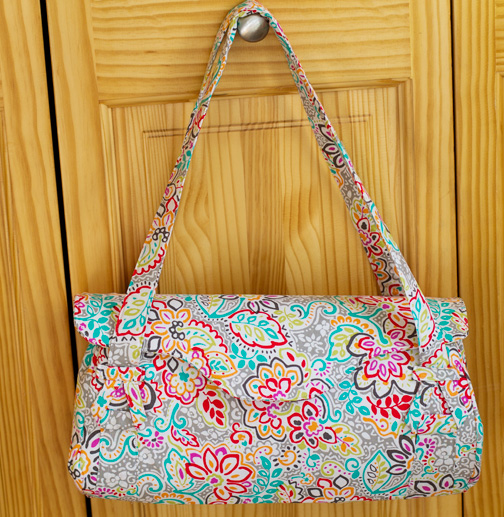
When it comes to sewing, my sister is the one who started it all. About 15 years ago, we both had friends who were having babies, so we taught ourselves to sew in order to make them baby quilts. And now, every once in a while, we still get together to tackle some project or other. This summer, she said she wanted to make herself a new bag or purse to take on an upcoming vacation, so we decided to both make Amy Butler’s Blossom Bag. I had seen the free pattern at Sew, Mama, Sew! and had it on my “to do” list for years.
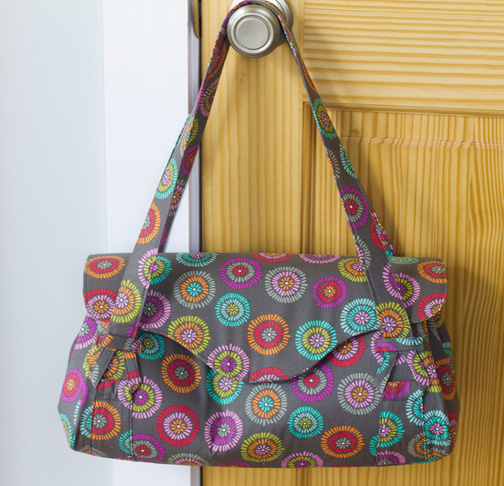
I have always read about how complicated and intimidating some of Amy Butler’s patterns can be, but this honestly was not particularly difficult. It was of course very tedious given all the different layers of interfacing. After an initial fabric and supply shopping trip with my sister, I ended up making most of my bag by myself and didn’t run into any problems.
When we got back together to sew her bag, however, we seemed to fall into our usual routine of making silly mistakes (that’s what happens when you’re talking instead of focusing!). As a result, her bag ended up slightly shorter than mine, but honestly, it still looks very nice.
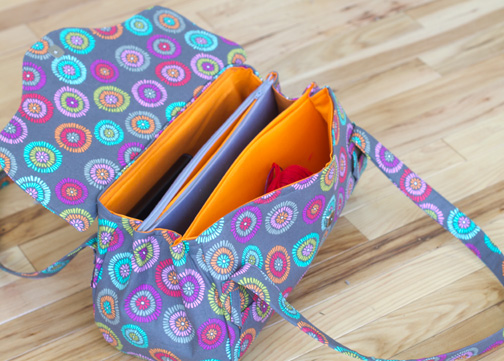
This bag is about three times the size of the purse I normally carry, so it still seems enormous to me. But I do like how roomy it is, and I like the dividers and zippered pockets.
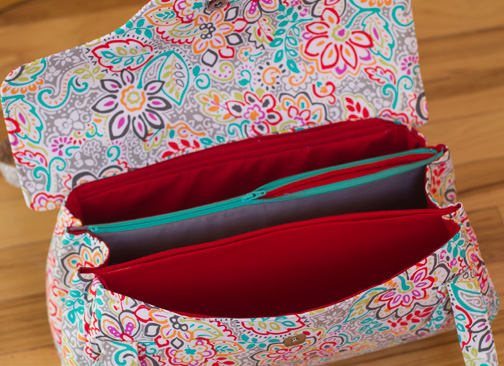
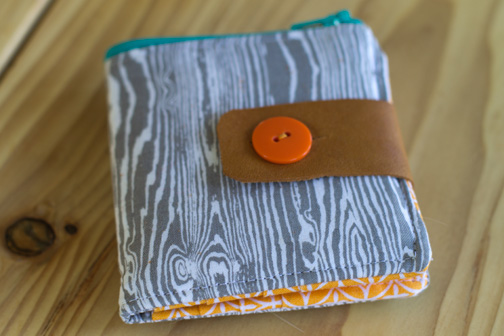
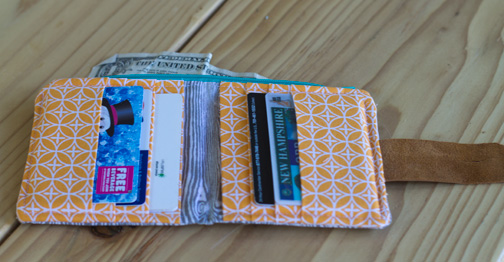
A few weeks ago, I decided the wallet I made myself two years ago was a bit too small, and had grown rather dingy. I came across this bi-fold wallet tutorial at Modest Maven and thought it might be just the thing. Plenty of room for cards, but it still folds up to a fairly small size. I liked the fact that it also has a large pocket for bills, though I almost never carry cash. But then it occurred to me: why not turn that pocket into a zippered pocket? The way the wallet is constructed is very similar to how you’d make a zippered pouch, except one “exterior” piece has extra layers for the card slots. (which then becomes the interior of the wallet when you fold it in half)
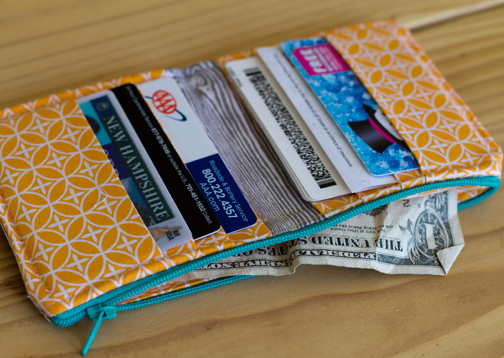
Essentially, I followed the instructions for the wallet, and combined them with these instructions for a zippered pouch at Skip to My Lou. Something went a bit wonky and my card slots on the left (in the picture below) are not quite as deep as the slots on the right, but I think that was just my carelessness.
Instead of a fabric and snap closure, I used a button and a scrap of leather leftover from these denim bags I made way back in 2010! If I remember correctly, I spent $5 or $7 on a leather jacket at a thrift store and cut it up to make handles for the bags.
Thank you to everyone who commented on my post. I loved reading everyone’s book suggestions, and I have a nice long list to keep me busy for a while! The crazy thing is, the comment chosen by random.org was #109, by Michelle, who recommended my ALL TIME FAVORITE BOOK: Anne of Green Gables. Ha!
Welcome to my giveaway! For first-time visitors, I am a reporter for The Associated Press by day, crafter by night. This blog has been a bit neglected, but feel free to poke around!
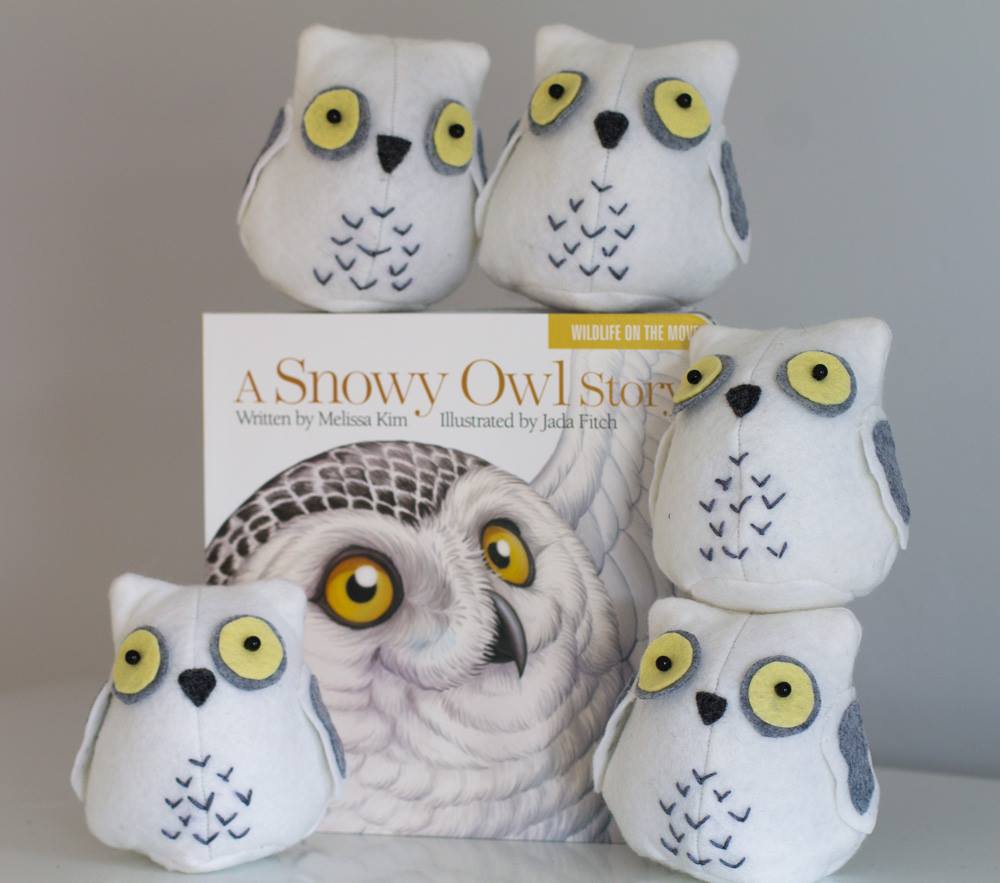
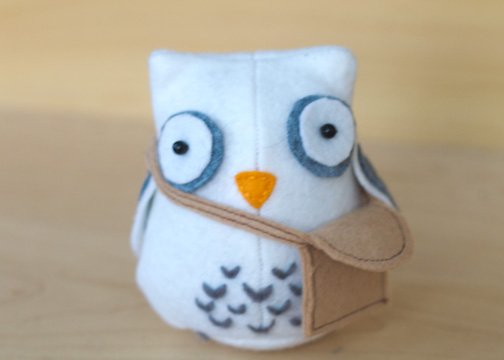
I am giving away one adorable owl, similar to the one I made to go with the Harry Potter doll I made for my friend’s daughter last month. Since then, I made a whole batch (flock?) for my talented friend, Melissa Kim, who recently wrote a children’s book about owls. This picture shows the owls I made her. I will make a new one for the winner of my giveaway, and you can specify whether you want an orange beak or the more true-to-life dark gray/black beak.
For a chance to win, just leave a comment. If you are feeling chatty, recommend a good book or audiobook. I’ve recently taken up running, and am enjoying listening to Tina Fey’s “Bossypants” audiobook while I run, but I’m about to finish it!
I will close comments at 5 p.m. PST Sunday, and will announce the winner Monday. I will ship internationally.
Please check out all the other great giveaways by clicking the image below:

Let me confess right up front: I strongly dislike the word “softie.” Almost as much as I hate the words “selfie” and “hoodie.” Yet here I am, entering the Spectacular Softies Contest at Sew, Mama, Sew!
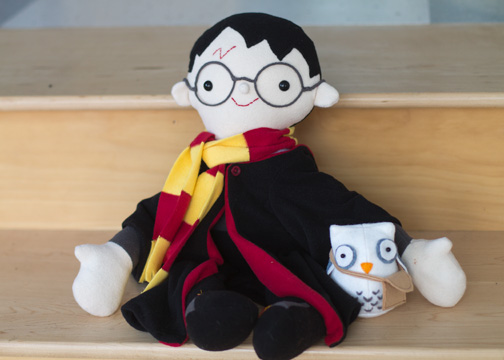
The timing was perfect, because I wanted to make something for my best friend’s daughter, who has a birthday at the end of this month. I’ve been on a bit of a Harry Potter kick with gifts for both her and her brother, so I decided to continue with a doll version of the boy wizard himself.
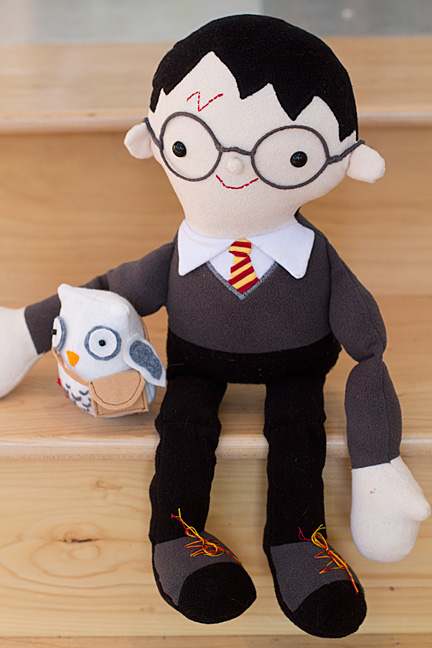
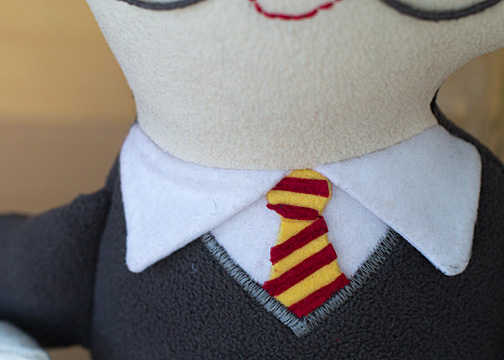
Rather than reinvent the wheel, I turned to the Liam doll pattern by Abby Glassenberg. I considered making removable clothing but decided I liked the look of the “all in one” original, so I modified it slightly to incorporate the shirt, tie and sweater as part of the doll. (Similar to how the face piece is handled, I added some interfacing to give some stability to the shirt front piece, and then essentially appliqued the tie and sweater on top. The collar is made from triangle pieces of fabric, sort of like how you’d sew ears… triangles sewed on two sides then turned right-side-out and then sandwiched in between the head and body pieces).
I took all the advice from the #sixweeksofsofties posts at Sew, Mama, Sew to heart and spent a long time carefully stuffing the finished doll. (I went a bit overboard and now one of the neck seams is popping a bit! Must fix that before I put this guy in the mail). And I went through about five different ideas for the glasses, ranging from embroidering them directly on the face to trying to make glasses out of stiffened yarn. What I ended up with: shaping thin wire into the correct shape and then wrapping it with gray yarn.
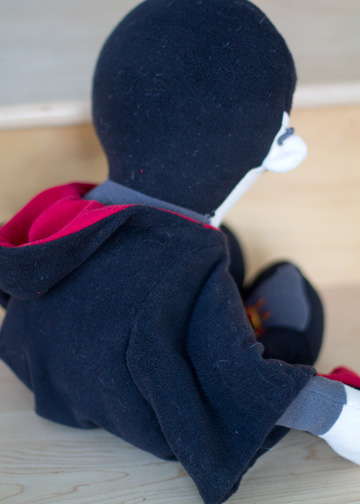
The robe was a challenge. I started with this pattern, which I had used previously for an American Girl doll, then altered the width, neckline and arm openings to better fit the shape of my doll. But I really did not want to make a lined robe out of fleece because it would be too bulky, so I found this pattern and resized to approximately the correct length. I ended up using the hood pattern from the second site, even though it doesn’t at all fit the doll’s head (Harry rarely puts his hood up anyway, right?) and then drafting the red facing just by trial and error.
I had planned to find a generic owl pattern for Hedwig, and then was thrilled that one of the Sew, Mama, Sew posts led me to the Owl Post pattern by Ric Rac. (When I asked my 10-year-old whether he liked the doll and owl, his first comment was: “Hedwig doesn’t carry a mail bag.” Such a stickler!
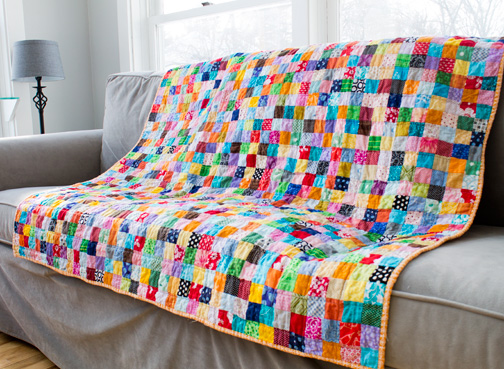
I can’t believe I started this quilt two years ago! It originally was part of my “Use It or Lose It” challenge in early 2013, when I was determined to use up a lot of my scraps and other miscellaneous craft supplies. And then it made a comeback in 2014, when I challenged myself to finish a bunch of works in progress. At some point in the last year, I did finish the quilt top but it sat untouched for many months. Finally, I pulled it out last week and finished it in a few days!
I used this tutorial at Red Pepper Quilts. In retrospect, I wish I had not included brown or black, or maybe stuck to a few bright colors. But I’m trying to remind myself that the ultimate goal was to just use up a lot of scraps.
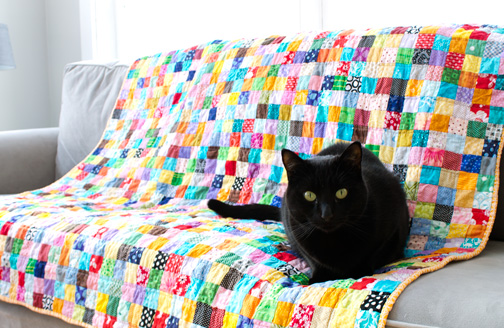
I was tempted to bring this outside and lay it on one of the massive snowbanks in my driveway, but it is minus 19 degrees this morning. And I couldn’t disturb this cute kitty!
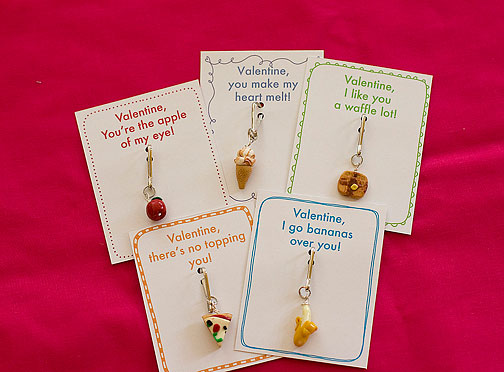
My son is now in 5th grade, and for the first time, he won’t be having a class Valentine’s Day party. That makes me a bit sad. On the other hand, I wasn’t coming up with any great ideas for cards …
But for those of you who are still looking for ideas, here are links to my past projects.
Click on the pictures to go to the posts:
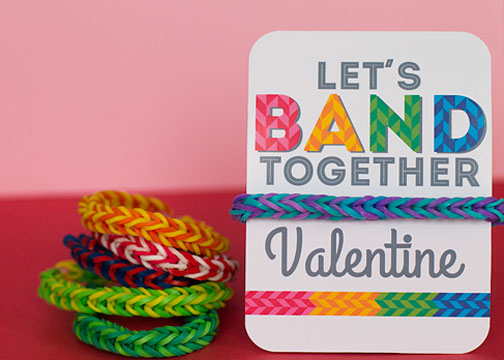 Rubber Band Bracelet Valentines
 Gold Medal Valentines
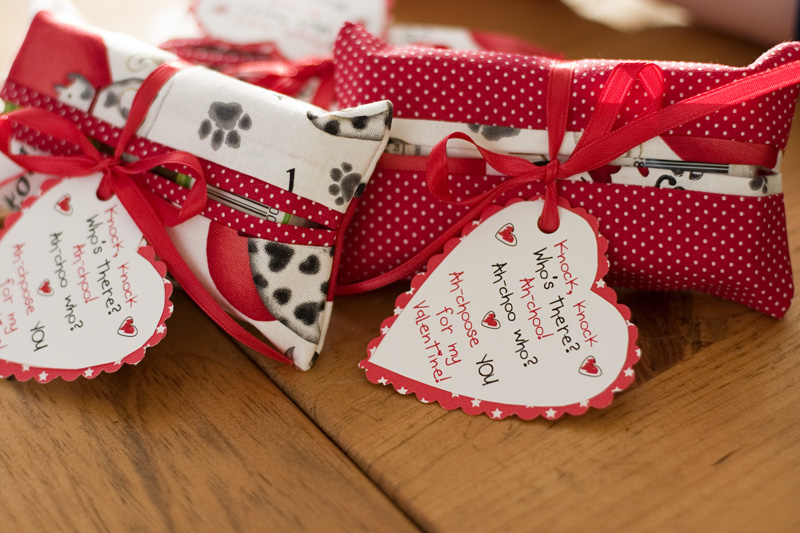 Valentine Tissue Cozies
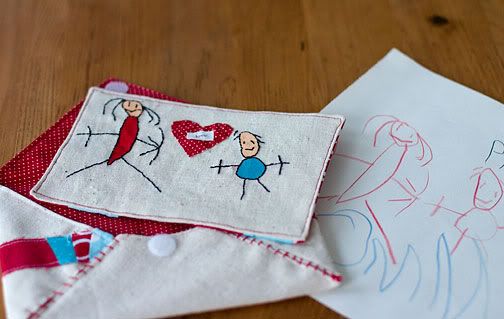 Embroidered Valentine
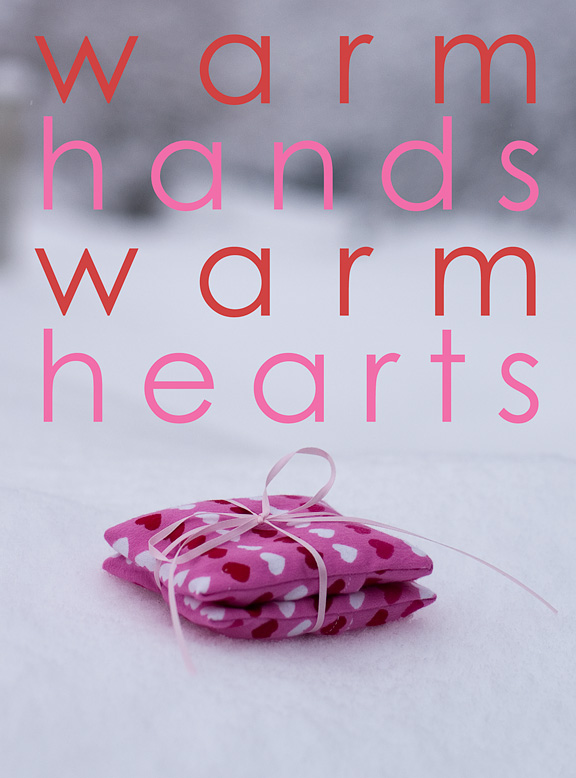 Valentine Pocket Warmers
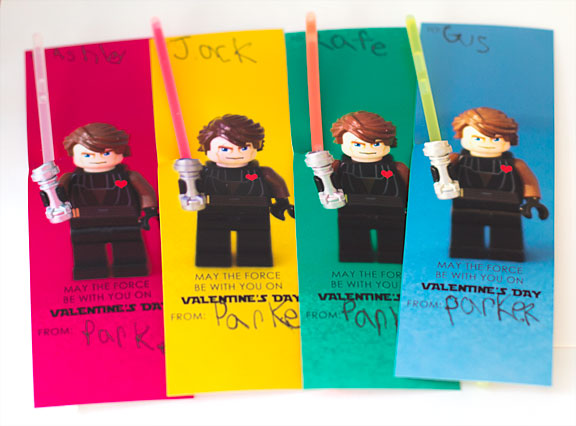 Lego Star Wars Valentines
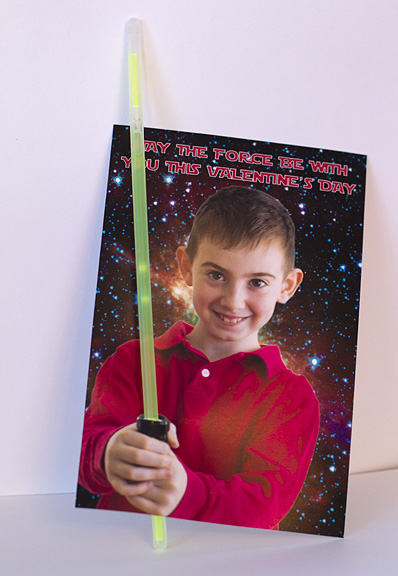 Light Saber Valentines 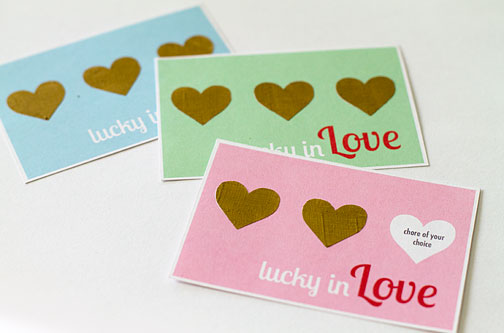 Scratch Ticket Valentines 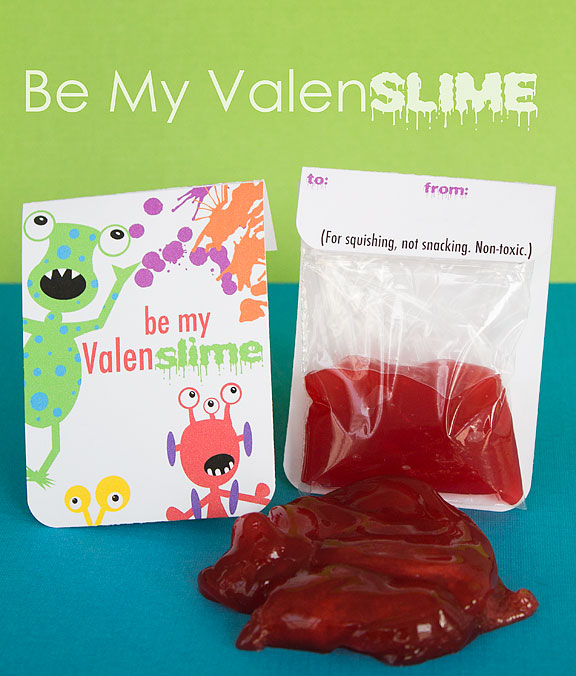 Valen-slime
Until I sat down and actually went through my photos, it didn’t seem like I made many gifts this Christmas compared to years past. Part of it is that I find it harder to make handmade gifts for older children, and part of it is just having a lot of other stuff going on leading up to the holiday season. But I still pulled together a fair number of projects, which I can finally show off now that I delivered the last few last weekend.
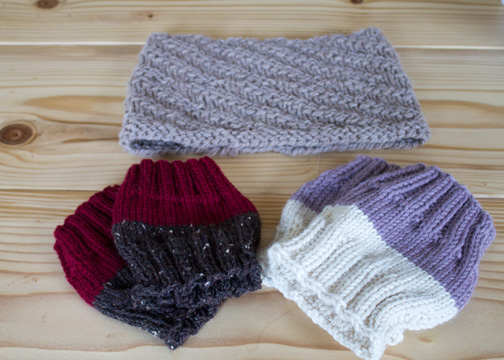
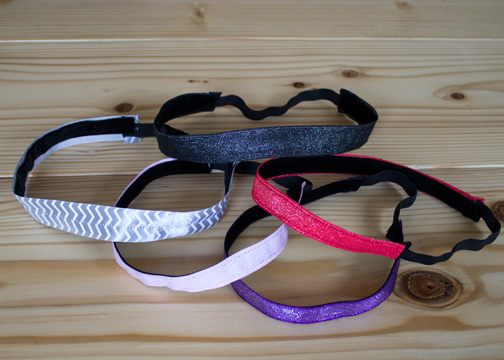
My cousin has four daughters ages 7-14, and one five-year-old son. For the two oldest girls, I knitted them reversible boot toppers and made them a few no-slip headbands using THIS tutorial. I’m thinking of making a few more, using strips of wool felt instead of the velvet, because it was hard to find velvet ribbon in the appropriate width.
I also gave my cousin some headbands, and a knitted cowl.
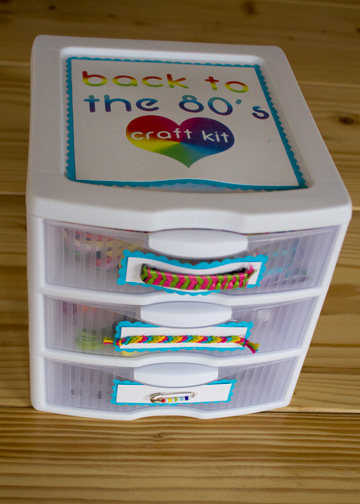
For the younger two girls, I made them a “Back to the 80s” craft kit like the one I made my niece last summer.
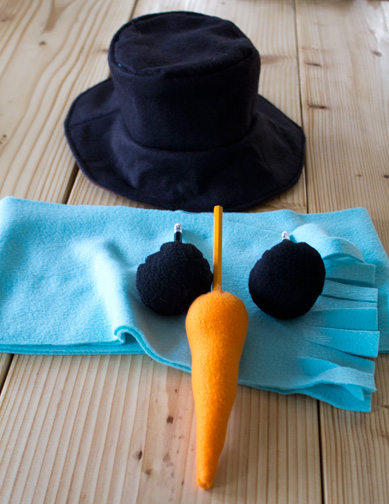
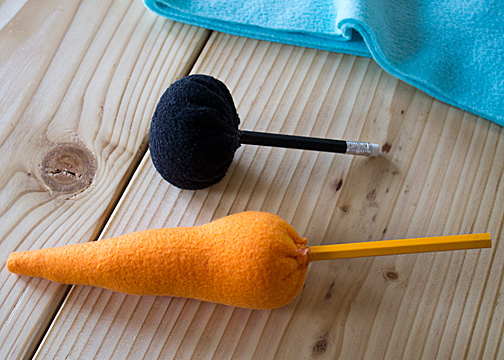
I made a very quick and simple Snowman Kit for my cousin’s son. I considered trying to draft a pattern to make the hat, but I ended up using the bucket hat pattern I already own from the book Oliver + S: Little Things to Sew, which I have written about here. (The pattern is available free on the Oliver + S website.) I used two layers of felt to give the hat some structure, and fleece for the accessories. For the eyes and nose, I gathered and glued the pieces to pencils so they can be stuck into the snow.
In other knitting, I made my mom a scarf and wide headband to go with a down coat I bought her, but I forgot to take pictures! I also made a few fleece “scarflets” for my friend’s daughters, and I hope to post a full tutorial and pattern here soon.
Back in October, my best friend and I took our sons to the Wizarding World of Harry Potter at Universal Studios. For Christmas, I made her a photo book using all the pictures we took, and made some Harry Potter-themed gifts for both her son and younger daughter.
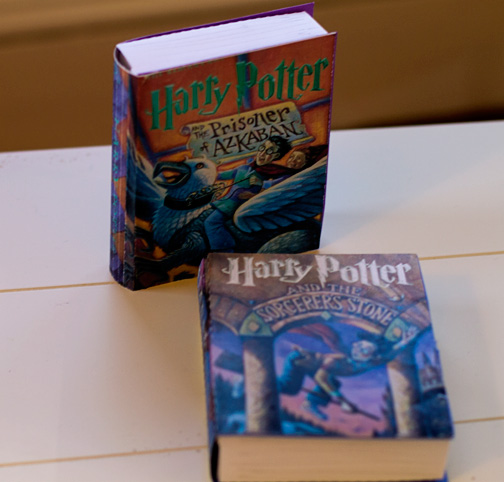
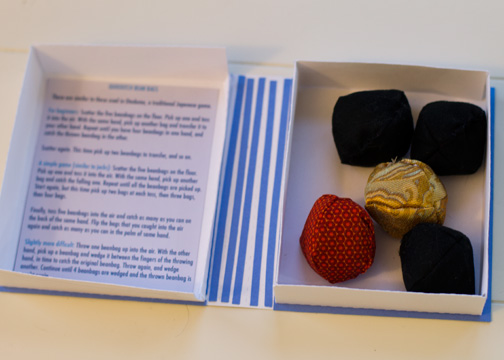
For him, I made more beanbags, like the Japenese Otedama I made in December. But since I wanted these to fit into a Harry Potter Quidditch theme (Golden snitch, quaffle and three bludgers) I made the beanbags round instead of using the more complicated Japenese shape/pattern. I used a four-panel beanbag pattern I found here, shrinking it a bit, and packaged them in a book-shaped box I made using a cutting file from the Silhouette online store. My scanner wasn’t working, so I took pictures of the Harry Potter books and altered them to fit on the boxes.
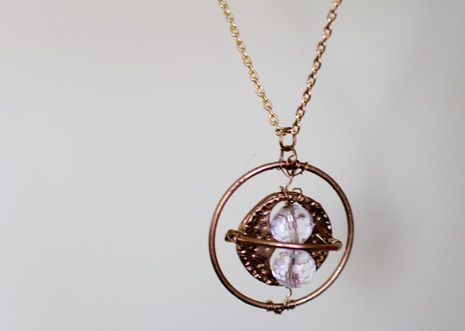
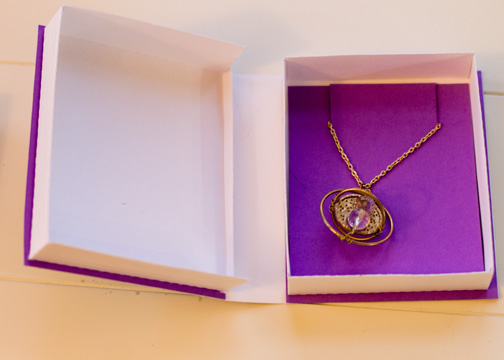
For my friend’s daughter, I made a time-turner necklace like the one Hermione gets in the third book. I was inspired by this tutorial, but I wanted to find a way to made the part around the hourglass look more like the version from the book/movie, so I rolled out some polymer clay and inserted it into one of the rings. All the rings and other jewelry findings I used were silver, so I had to spray paint everything gold. And I don’t have much experience with wire wrapping, so this was a lot more difficult than I thought and the finished product was not as nice as I had hoped.
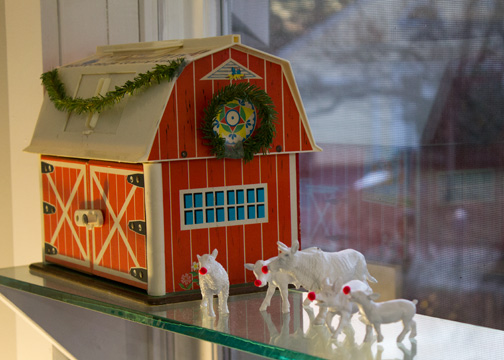
I must confess, I started this next project with intentions of making ornaments to give to others as gifts, but I ended up keeping most of them myself! Inspired by this adorable advent calendar at A Bubbly Life, my friend Annmarie and I made more than a dozen of these animals. For some, I used a bit of Sugru to attach hooks to their backs to turn them into ornaments, like I mentioned in a previous post. For others, I left them as figurines, and grouped them with my old Fisher Price barn I had when I was a kid.
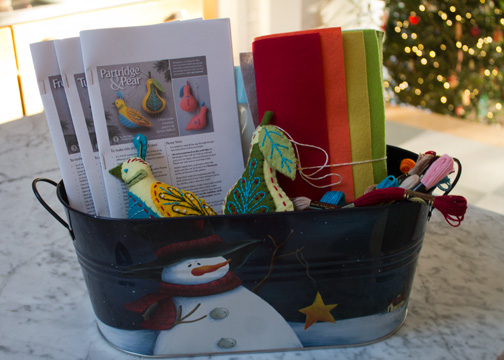
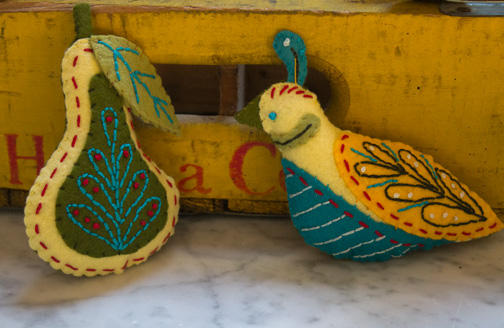
For Annmarie, I combined crafting supplies with a little handmade gift: I bought her the first three “Twelve Days of Christmas” ornament patterns by Larissa Holland at mmmcrafts , a bunch of wool-blend felt and some embroidery floss so she can make them, plus I made the partridge and the pear tree. (You’ll note that I copied the pattern’s color choices almost exactly). I LOVE the way these patterns use a printable, wash-away stabilizer so there is no transferring of designs, you just stitch right on the stabilizer. The patterns call for Sulky Printable Sticky Fabri-Solvy, but I found a similar product, Pellon Stick-N-Wash Away, at Jo-Ann’s.
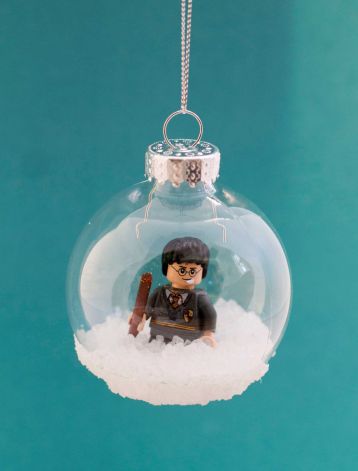
For my latest AP craft story, I wrote about several methods of turning small toys into Christmas tree ornaments. You can read the story HERE (as usual, if the link expires, just Google my name and a keyword or two, in this case, toys and ornaments).
For the Harry Potter ornaments, I followed a great tutorial at the Craftberry Bush blog. The others were made using a new product called Sugru, that feels like Play Doh but cures overnight into flexible rubber.
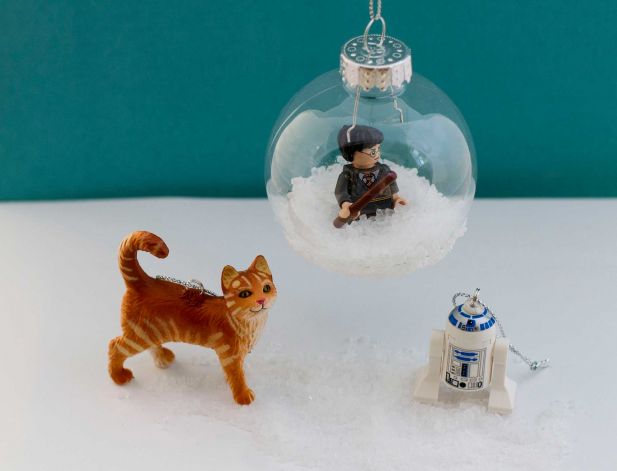
(Full disclosure: I approached my son about using one of his Lego Star Wars clone troopers for this project and he flatly refused. Apparently each of the dozen or so minifigs he has is ESSENTIAL and would be immediately missed. Sigh.)
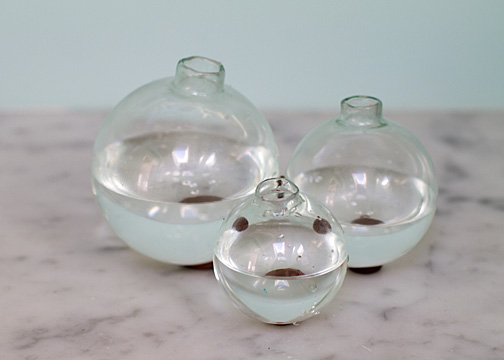
I also experimented a bit with the Sugru to make a few bud vases out of some glass ornaments I had leftover from some other craft projects.

I just rolled bits of Sugru into balls and stuck it on the bottom of the ornaments. It was tricky to get the placement just right, and even after curing, the single-ball vases seem slightly unstable, at least when they’re empty. When they have water in them, they’re a bit more stable. It was also quite tricky to stick the three ornaments together (by then, I had mixed a bunch of Sugru together, and such a tiny bit comes in each package, that all I had was this rather unattractive brown. If I was doing this again, I’d use white, or maybe green, that would blend in with flower stems).

Thank to everyone who entered my giveaway, and for all the great food and drink suggestions! The winner is Steph, who said: “I can’t wait to play these with my son. Thanks for the chance to win them. I like hot apple cider and kringla cookies.”
|
|