
Aren’t these little story dice adorable? I used to think so, but making them turned out to be such a frustrating process that I’m no longer sure! I was inspired by this wonderful set at The Small Object and this tutorial at Matsutake on transfering images to wood using glue and Mod Podge. But I take full credit for coming up with the CRAZY idea that I could make a set for each of my son’s (TWENTY-TWO) pre-school classmates. In the end, I made eight sets, enough for his closest friends and a few other friends and relatives.

The images I used are digital scrapbooking elements by Kate Hadfield. I already had a few sets, and I love the painted style. (And at the time, I justified the cost by figuring that if I divided it among 22 kids, it was a bargain! Ugh). I tried the Mod Podge technique but it didn’t work. Maybe I didn’t use enough glue or Mod Podge. Then I tried a rub-on technique using transparency sheets. No luck. Finally, I used this packing tape transfer technique I read about at How About Orange, and finally, that worked. (Note: this technique works with laser printed images and photocopies, but not inkjet prints)
With all that out of the way, this really is an easy project, but it is not a quick one. I’m happy but not thrilled with the final result. Some images didn’t transfer as well as others, or the final coat of acrylic spray turned a bit cloudy for some mysterious reason.
MATERIALS:
wooden cubes (mine are 1.25 inches)
a variety of 1-inch images (digital scrapbooking elements, clipart or hand-drawn)
laser printer
clear packing tape
scissors
small bowl of warm water
Mod-Podge
paint brush
clear matte spray
INSTRUCTIONS:
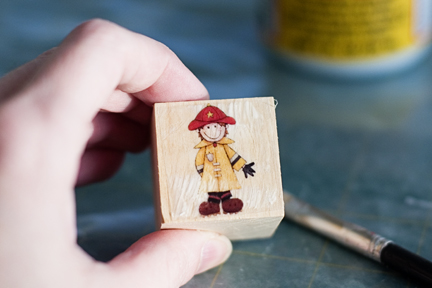
1) Print images using a laser printer. I used Photoshop to format mine in columns because they will be covered later with strips of packing tape.

2) Cover images with packing tape.
3) Cut out images. (Alternatively, you can leave the sheet of paper whole and cut the images apart later. It’s easier to cut them now, but the next step — rubbing off the paper — is easier using the full sheet)

4) Dip the tape-covered image in warm water to moisten the paper backing. I found that if I let them soak for more than a minute or so, the image didn’t transfer well. So just dunk it enough to get it wet.

5) Using your fingertips, NOT fingernails, rub the paper until it starts to come off. Continue wetting the paper and rubbing it until it is removed.

6) The images will still have a bit of adhesive stuck to them, so lay them sticky-side up to dry. I noticed that pieces that often appeared totally clear turned out to have bits of paper still stuck to them that didn’t show up until they dried. You can go back and rub them off again or just tell yourself that a 5-year-old is not going to notice or care.

7) Apply a thin layer of Mod Podge to both the block and the image and adhere the image to the block. Repeat for remaining sides of the block. Allow blocks to dry, then seal with matte acrylic spray.

My husband is hosting seven of our son’s friends tomorrow for a cookie-baking party. I’m giving the four boys sets of the story dice. The girls are getting polymer clay charms (pictures coming soon!). Those were much easier, and very cute, but I feel a little bad giving the boys the more “educational” toys and the girls jewelry. I hate to contribute to gender stereotyping…
Leave a Reply