|
|
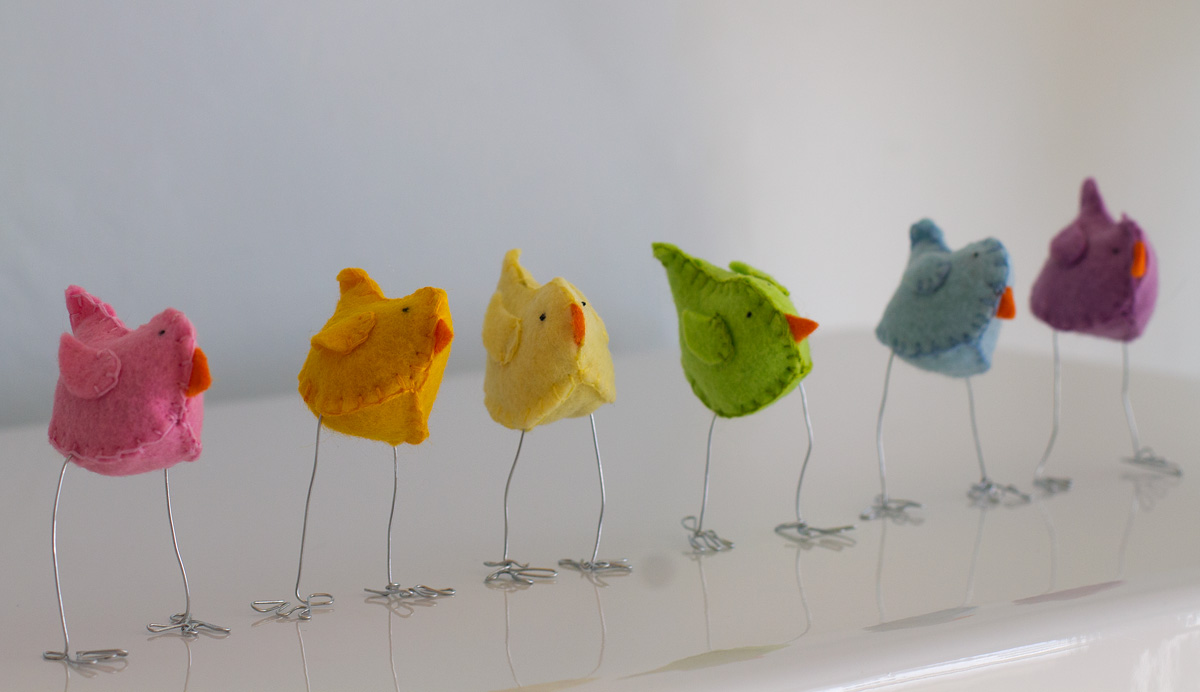
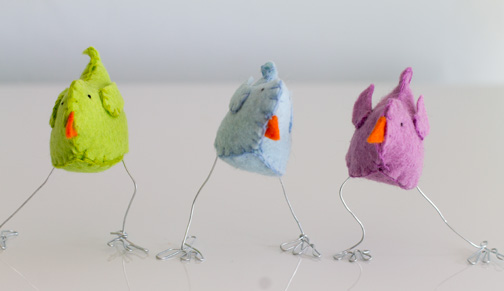
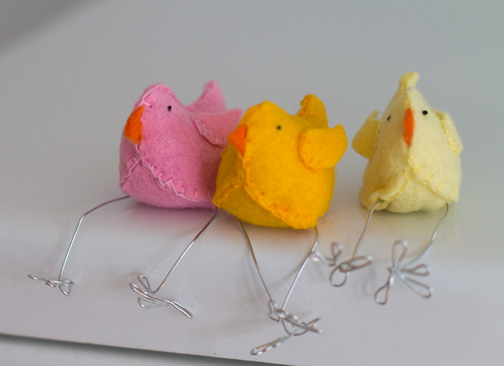
I once again thwarted my own efforts to avoid buying new craft supplies in order to make these adorable chicks! I could not resist, so I purchased a bundle of wool-blend felt sheets from an Etsy shop called Felt the Love. (It was a happy surprise to realize when I received my package that she is also located here in New Hampshire!)
You can find the pattern and instructions for making these chicks at Myrtle & Eunice. I found making the legs a bit challenging, but that clearly did not stop me from making a whole flock!
My son is obsessed with Minecraft, which means I spend a lot of time trying very hard not to appear utterly bored when he wants to talk and talk and talk about it ALL THE TIME. But when he got invited to a birthday party for a girl he may or may not have a crush on, and he told me she also loves Minecraft, I was happy to make her a Minecraft-related gift.

(Creeper graphic by Danixolider on deviantART)
I quickly came upon this tutorial for a plush Creeper on Instructables.com. Instead of fleece, I used some kind of “cuddle” fabric from Jo-Ann’s. (Going against my pledge to avoid buying new craft supplies. But I used a coupon, so we’re talking maybe $2 worth of fabric). Before cutting out the pieces, I ironed very light-weight fusible interfacing to the back of the fabric which made it easier to cut and sew because it added a bit of stability. Still, there are bits of green fur all over my craft room …
Unlike the tutorial, I also sewed everything by machine instead of by hand, except the last bits of closing up the openings after stuffing. And I used felt shapes ironed on with fusible webbing to make the face.
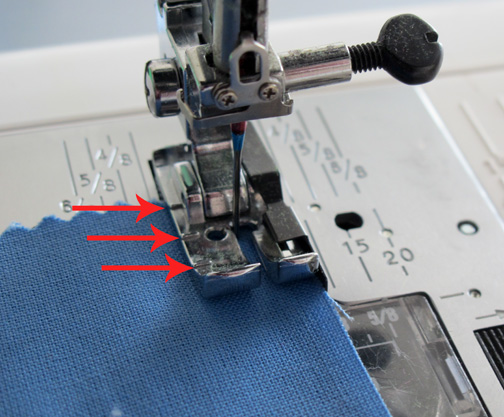
Here’s a little tip that I figured out for the first time, even though I’ve had my sewing machine for about a decade. Because this project involved sewing basically a bunch of cubes, I wanted to start and stop sewing 1/4 inch from the ends of each piece. Duh! There are markings on my sewing machine foot that make it very easy to do just that. For years, I’ve just been sort of eye-balling it, when all along there were these handy little guides.
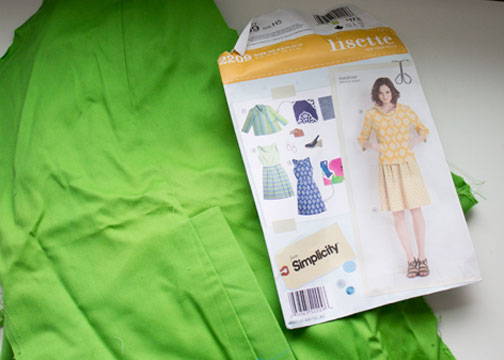
I also was able this week to cross another project off my list: the long lingering “Passport Jacket,” one of several Sew Lisette patterns I purchased back in 2010.
I intended for this to go with the dress I made, but now that it’s done, I don’t like how it looks with the shape of the dress. I think something with a fitted skirt looks better, and I like how it looks with jeans.
This jacket is probably the most complicated garment I’ve ever made, and it was mostly trouble-free, except the facing along the back of the collar is all bunched up for some reason, even though I unpicked it and sewed it twice. And I got all the way to the last step, hemming the sleeves, when I accidentally cut where I meant to fold, so the sleeve hem is tiny.
Overall, I think I like it, though I can’t tell whether it is supposed to stay closed with one button or swing open … it tends to swing open a bit.

While I really like having the opportunity to make gifts for little girls, I must admit, I find sewing doll clothes _ particularly tops _ very frustrating, what with all the tiny sleeves and hems, etc. But in making my latest batch (birthday gifts for my best friend’s 7-year-old daughter), I found some easy workarounds.
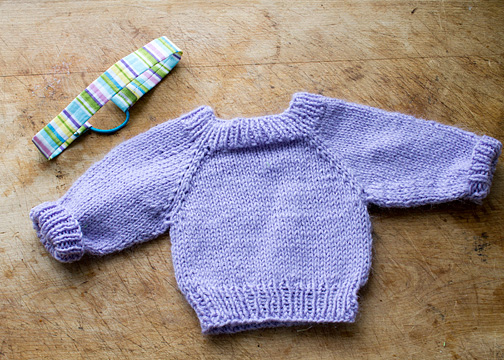
Knitting a sweater, even a doll-sized one, is not a quick project (at least for a relatively new knitter like me), but it was mostly stress free, considering it is the first sweater like this I’ve ever made. (Much easier than the cardigan I made for my niece, because this one has no seams, it’s all one piece).The free pattern can be found at Sophia’s Sundries HERE.
The matching headband was super easy and quick, thanks to a tutorial I found HERE.
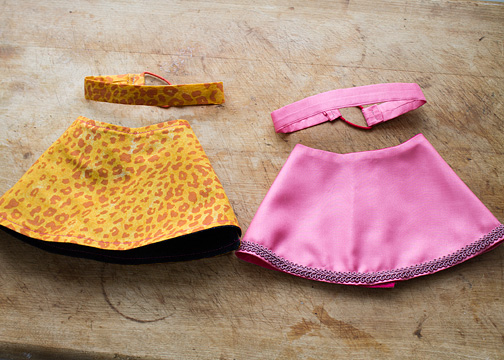
The skirts involve a very clever repurposing of a pattern I already had, for a hat! I saw this idea on an Oliver + S blog post by Rachel at Nest Full of Eggs. Her version uses bias tape around the edges, but I decided to simplify it a bit by just sewing the skirt and lining together right-sides-together, leaving an opening for turning, and then turning it right-side-out.
Very quickly I had two reversible skirts!

I didn’t have any purple fabric to make a skirt that actually matches the sweater, but I was trying to stick to my pledge to “use it or lose it” and not buy new craft supplies. In fact, the animal print fabric is left over from a baby quilt I made for a girl who just turned 13!
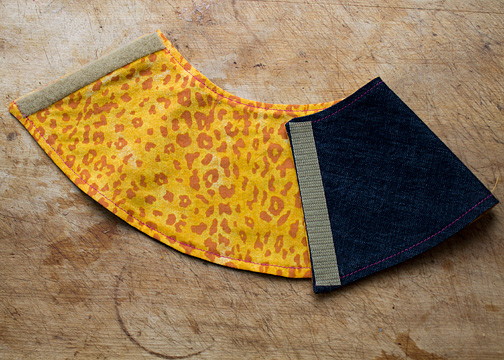
Here’s a peek at where the other fabrics/supplies originally came from.
The purple yarn is leftover from the monster I made for my niece.

The pink satin fabric and the hair elastics I used for the head bands are leftover from the fabric flowers I made for my cousin’s daughters in 2010.

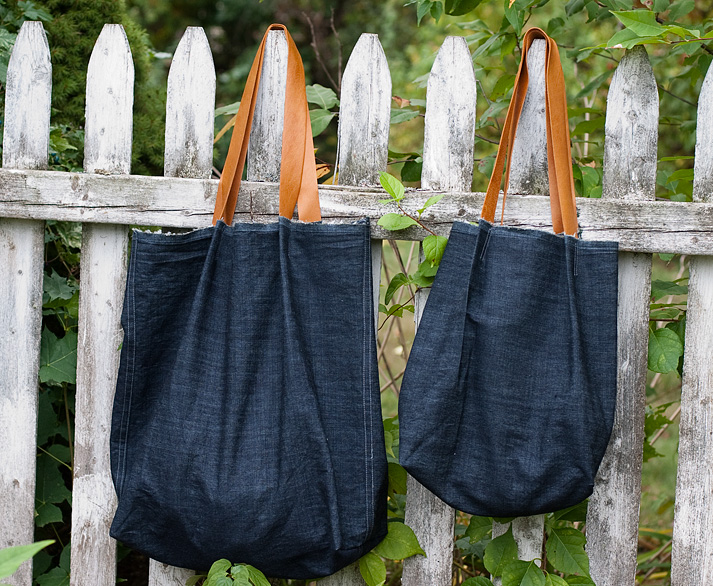
And the denim fabric is leftover from the tote bags I also made in 2010. They were so easy, I should make some more.

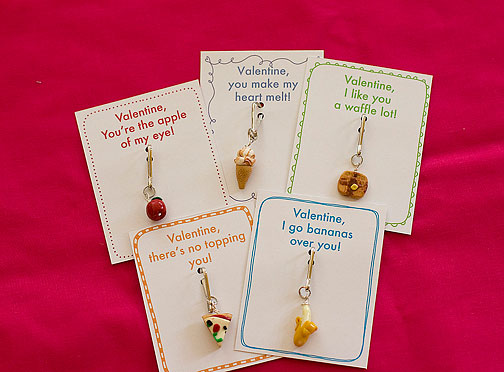
With Valentine’s Day falling during the Winter Games this year, I thought it would be cute to come up with an Olympics-themed Valentine. But what can I say? My son is more crafty than athletic (Gee, wonder where he gets that …) and he decided he’d rather make his classmates rubber band bracelets instead. But I developed my Olympics idea anyway, and wrote about both ideas for my latest AP craft story. You can read it HERE, but know that news links often expire quickly, so if the link doesn’t work, just google my name and valentines.
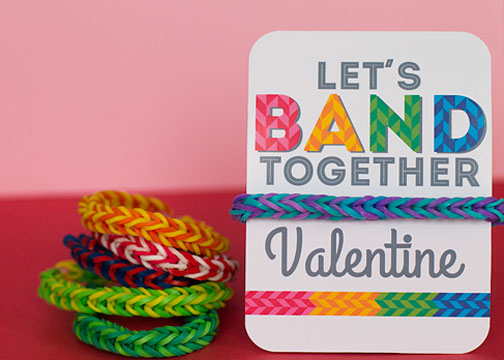

Parker was happy to eat the chocolate “gold medal” I used for this photo, but he was determined to stick with the bracelet idea, and has made about 15 so far. He has informed however, that he will not be writing “LOVE, Parker” on any of the cards.
You can download the cards here:
BAND VALENTINES
OLYMPICS VALENTINES
I have two new Valentine ideas to share, but I have to wait til next week, when an article I wrote for AP is published. In the meantime, here’s a roundup of all my past Valentine projects all in one place. I don’t think I’ll ever top the light saber Valentines from two years ago!
Click on the pictures to go to the posts:
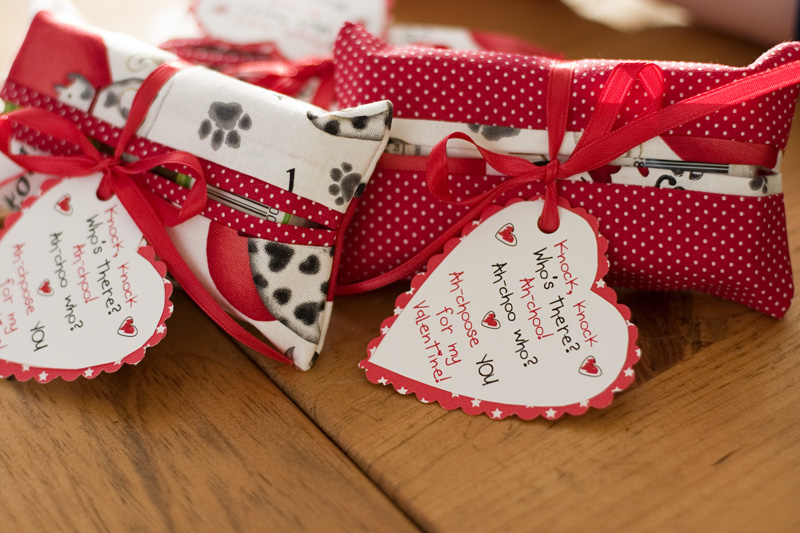
Valentine Tissue Cozies
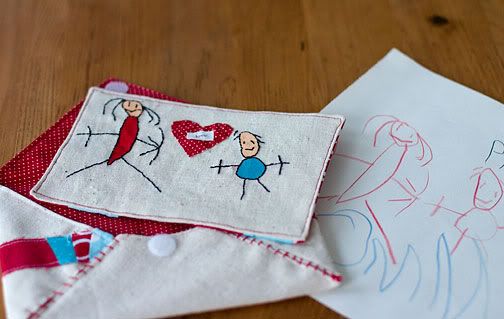 Embroidered Valentine
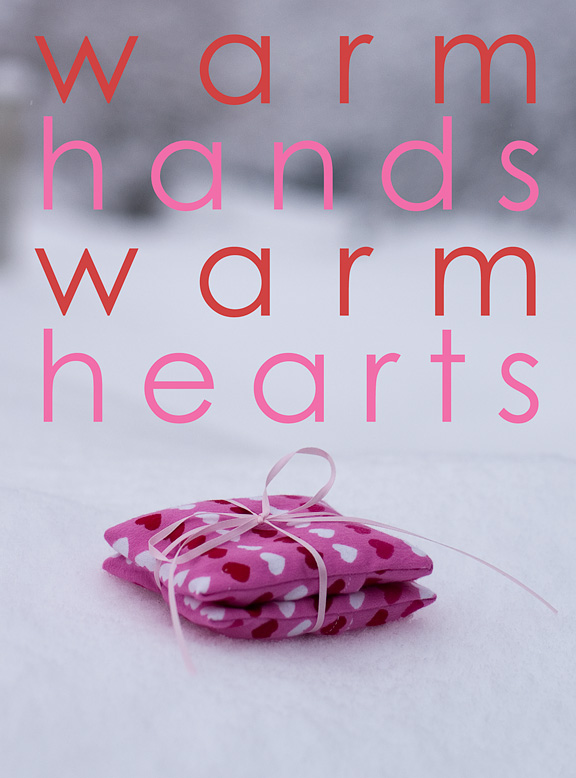 Valentine Pocket Warmers

Lego Star Wars Valentines
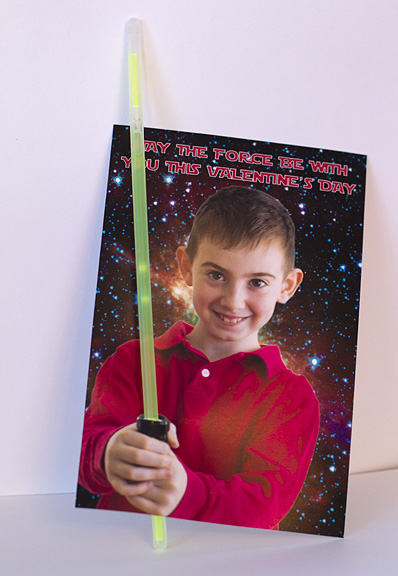 Light Saber Valentines 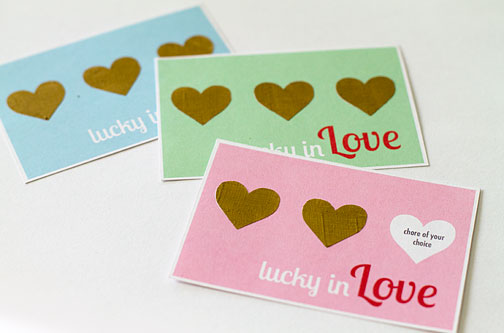 Scratch Ticket Valentines 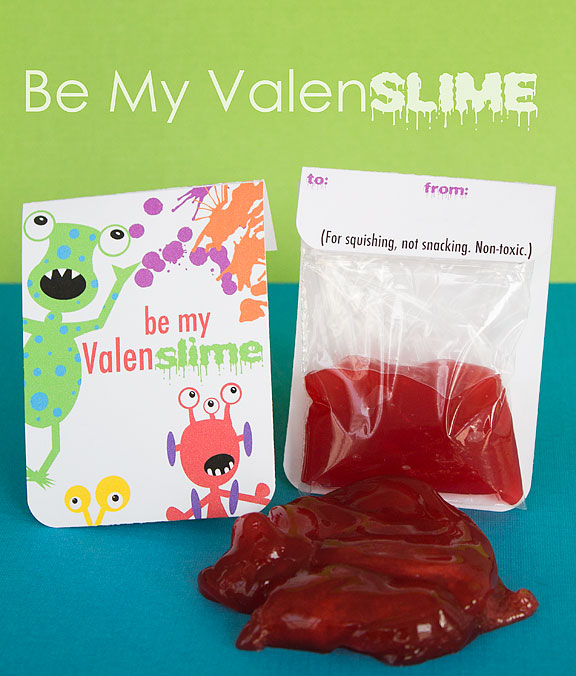 Valen-slime
I am making a bit of progress on my unfinished projects! (Which is the upbeat way of saying, “I finally delivered these Christmas gifts nearly a month late!”)
It took only a few minutes to finish these “Snowball buddies,” so I really had no excuse for procrastinating. Though they are designed to be Christmas ornaments, they were belated gifts to two of my cousin’s daughters, so I attached little clips on them and thought maybe they could attach them to their backpacks. And that is exactly what the girls thought of when they opened them, so that was a relief!
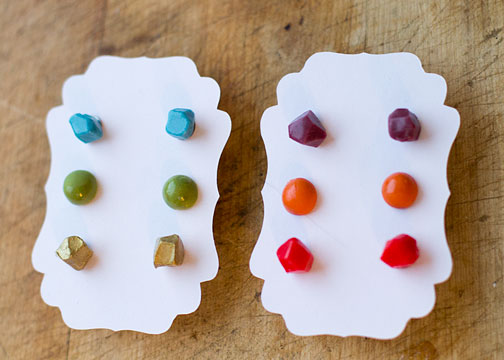
For my cousin’s other two daughters, I made some polymer clay earrings. These were so easy, I’m going to make some for myself as well. I used two tutorials: the Geometric Clay Earrings tutorial at Rays of Purple and the Polymer Clay Geometric Dome Earstud tutorial at The Creative Muslimah. For the faceted earrings, I mixed translucent clay with colored clay, except for the gold pair. For those, I used white clay and painted them gold later. I also tried another tutorial that involved coating round balls of clay with tiny glass beads, but that one didn’t work very well. What a mess.
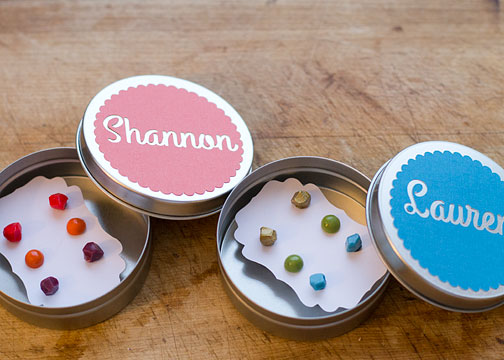
I used my Silhouette machine to make the earring cards and to cut their names out of card stock to decorate the little tins I put the earrings in.
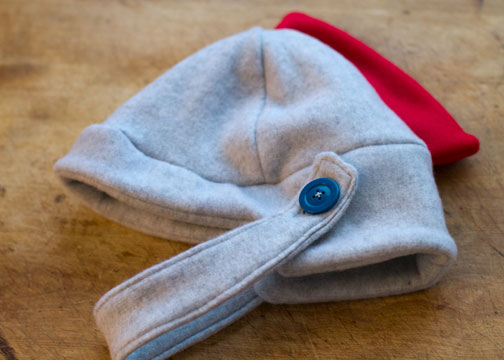
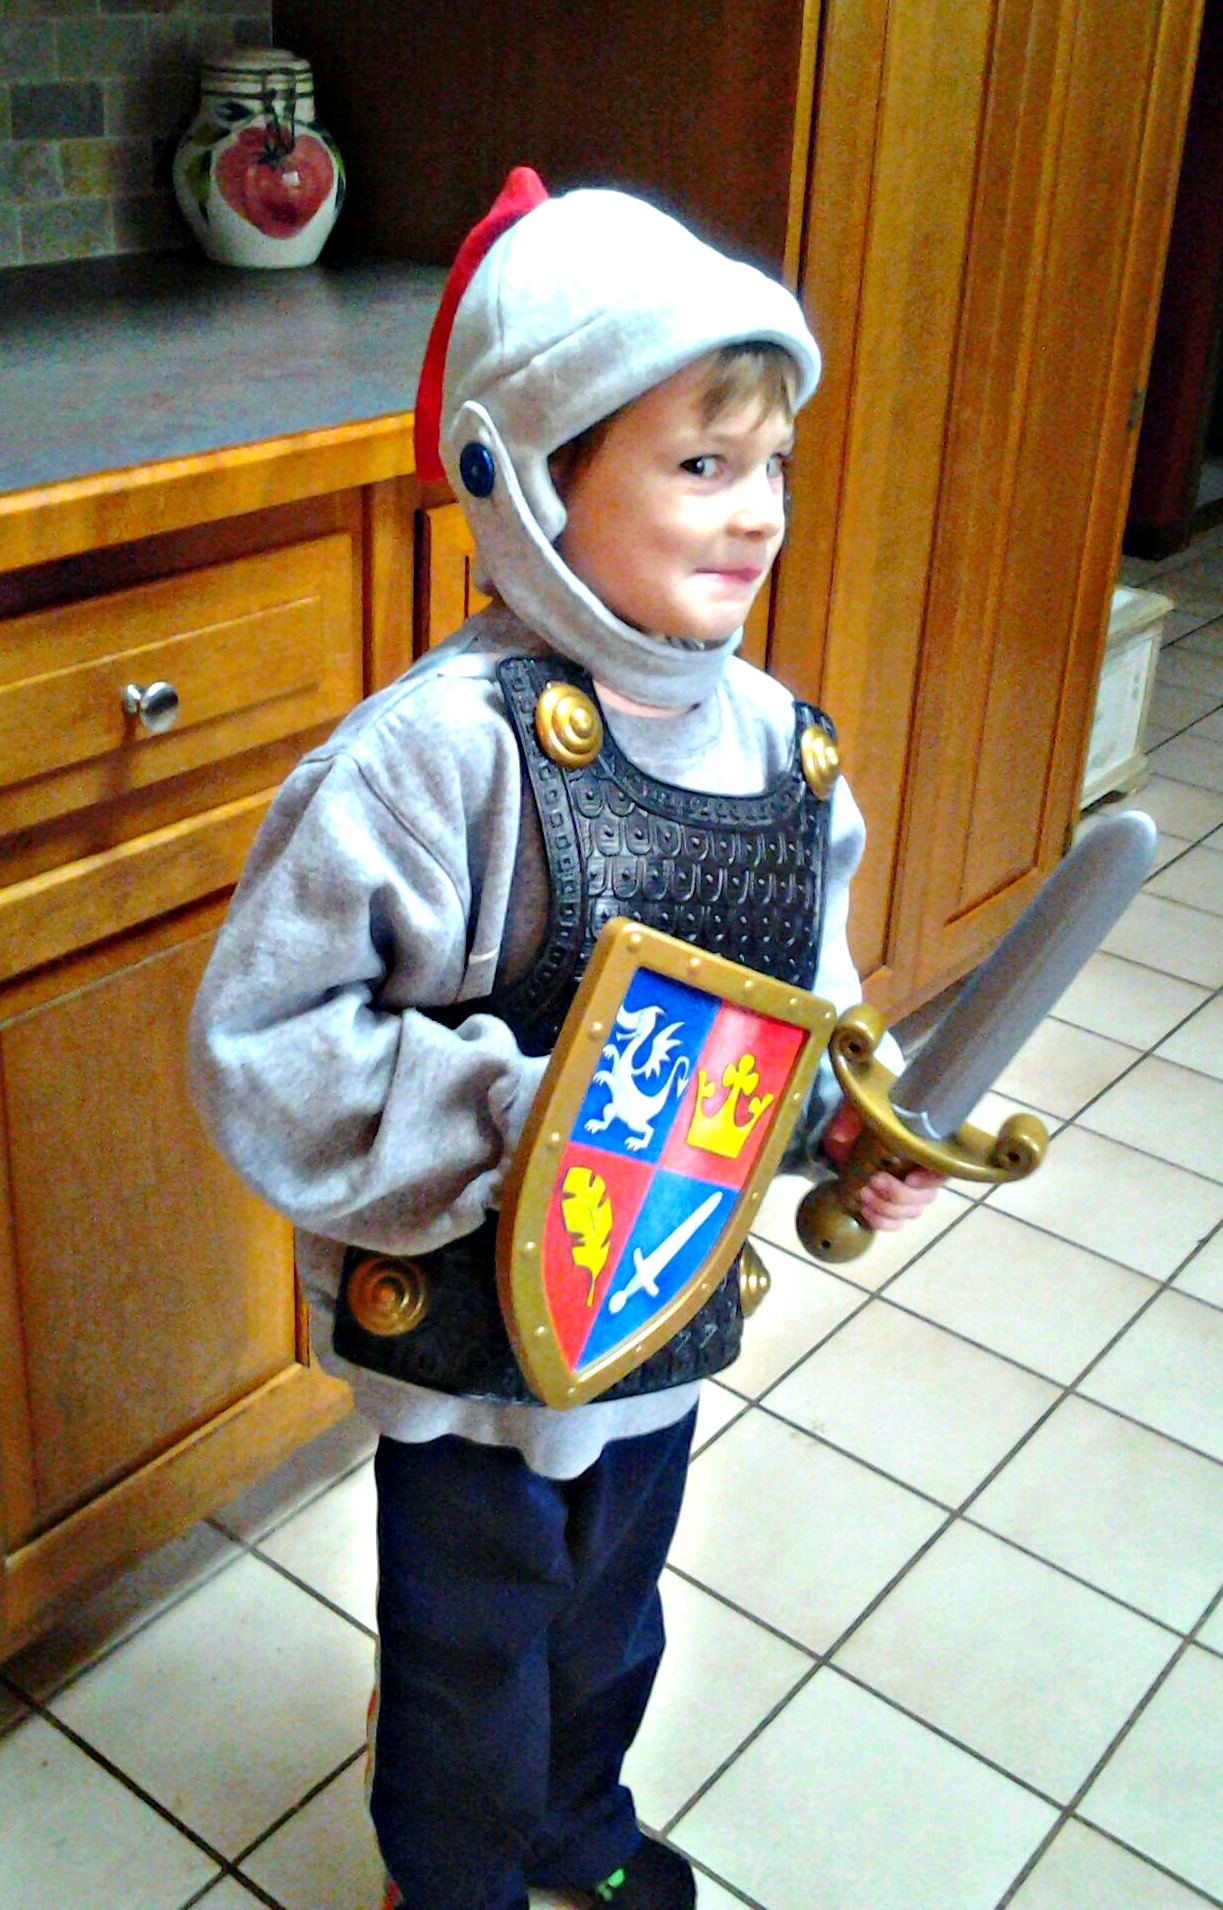
And for their little brother, I made this cute fleece knight helmet/hat. Parker would’ve loved this when he was little! I only had light gray fleece, but I really like the original at Wine & Glue, where I got the free pattern.
Here’s the adorable recipient, all decked out in his knight accessories:
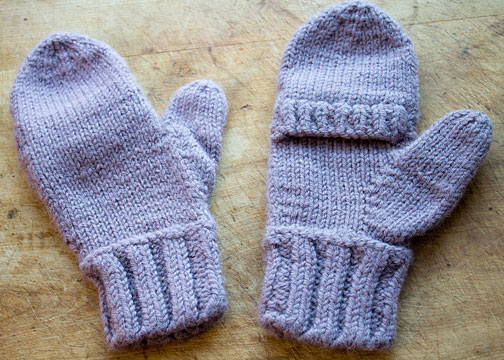
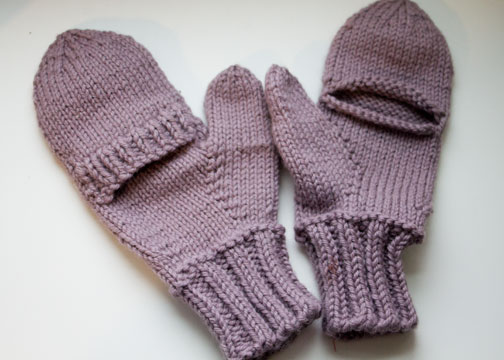
And finally, something for me, and something to cross off my unfinished project list! Here are my new mittens, after a trip through the washer and dryer to soften them up and shrink them a bit. The wool felted a bit in some spots but I think that just makes them more durable.

The problem with being all smug about making Christmas gifts in part to avoid crowded stores/malls is that you can then find yourself in a panic at 10:30 p.m. Christmas Eve still racing to finish say … a stuffed Perry the Platypus …. and then almost dissolving into tears when you accidentally cut a hole for an arm in the back of the head.
Sigh.
My decision to make a stuffed platypus for Parker was made rather late … and even though Perry should not be hard (he’s basically a rectangular box with legs), I’m not very good at engineering arms and legs from scratch. I thought I had figured it out, but I had already sewn part of the body together when I tried to cut a hole for the legs. And ended up cutting along the back/head instead of the belly. Oops. So, in a move that was very unlike me, I walked away.
It did make me a little sad not to have something homemade and special for Parker under the tree, though I did make him a Minecraft shirt which he seemed to like. And honestly, we splurged big time on the Legos this year, and he was thrilled. So I will finish Perry soon, and maybe make him a Valentine’s Day gift.
So, that’s a long intro into my New Year’s crafting resolution, which is FINISH FIRST. (as in, finish old projects first, before starting new projects)
Last year, my crafting resolution was USE IT OR LOSE IT, and I think I did pretty well using up fabric and other supplies rather than shopping for new. And I uncovered and re-organized so many long forgotten supplies when I moved my craft room into a new space this fall. But before I dive into those, I’m determined to finish up all the lingering projects. And to keep track and hold myself accountable, I pulled them all out and photographed them so I can post them here.
First, a few knitting projects.
These mittens are a combination of several patterns. I wanted something dense and warm, but with a way to use my fingers if needed. (Part of my AP job involves shooting video, often of snowstorms this time of year, and I need my fingers to operate the camera!) I started these back in March and ran out of yarn when I was 90 percent done. I just need to add the ribbing along the finger opening on one mitten.
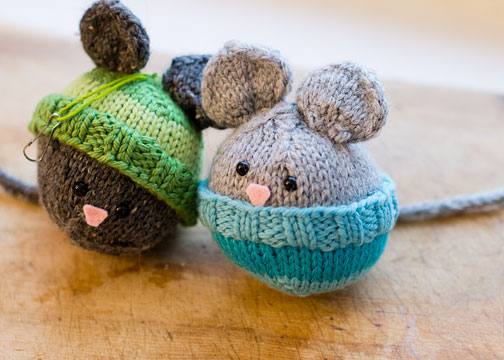
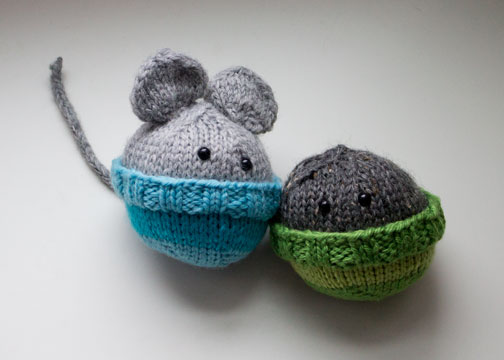
I did manage to finish one of these adorable Snowball Buddies, but I gave it away to my son’s friend before taking a picture. But I have two more to finish. Still deciding whether the earless one should be a cat or another mouse.
In other holiday decor, I’m embarassed to admit that I think this next unfinished project dates back to 2009! At least, that’s when I wrote a tutorial for making a simple half-circle bunting for Thanksgiving. I think I made a Halloween version for my sister, who has an annual pumpkin-carving party, and had a bunch of circles left over. And I had some vague plan to make a few different versions for other holidays and give them all to a friend for Christmas, or maybe her birthday. But maybe I’ll just finish this one and keep it for myself.
One of my other long-lingering projects is the Passport Jacket from the Sew Lisette pattern collection. I made the dress way back in June 2011, and part of the jacket, then ran out of fabric for the sleeves. I bought more fabric, and then it sat in a box for more than two years! Time to get it done!
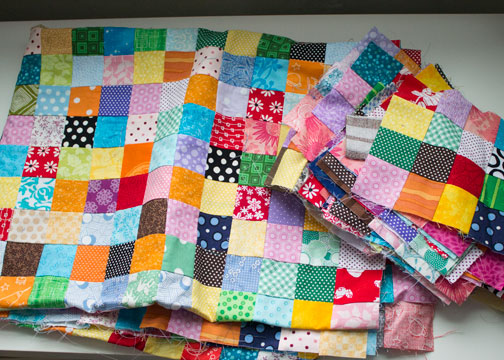
One of my major “use it or lose it” projects was a postage stamp quilt that took care of a big chunk of my random scraps of fabric. I’ve made all the squares, and have sewn most of them together, but still have to add the last row, I think, and then do the backing and quilting.
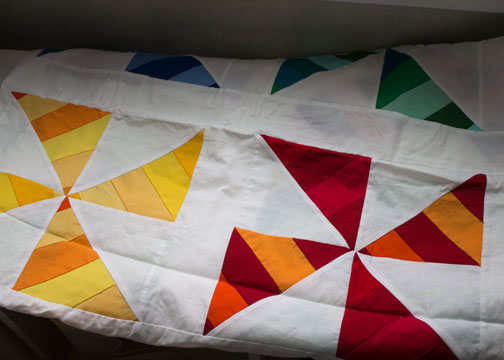
I also want to turn this curtain into a quilt. I originally made this to cover up the opening to a storage/loft space at our summer cabin, but we’ve since opened up that space and turned it into a sleeping loft for Parker. You can see a bit of it in the picture below, behind the rafters. I’m not sure if I have any more solid fabric to make more pinwheels, or if I’ll just figure out a way to add borders to make it a quilt.
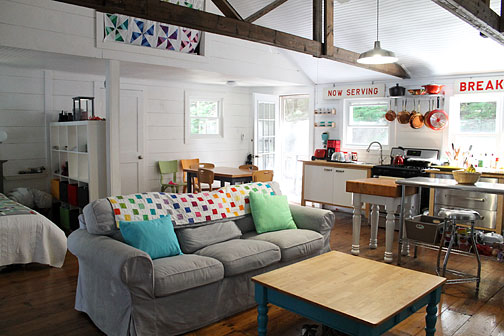
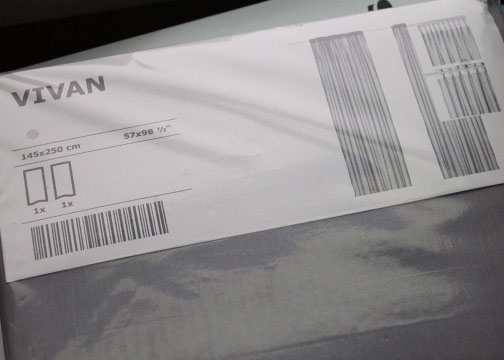
And speaking of curtains, as we continue switching rooms around ahead of our major kitchen renovation next summer, I’m replacing the really old, worn out curtains in our former dining room, now family room/playroom. I don’t think I’ll keep these permanently because I want to paint that room, but I bought some very cheap gray IKEA curtains in October and need to hem them. I’ve finished one pair but need to do three more.
I also have all the supplies to make some birch bark candle holders. I made a few for an AP craft project in June 2012, but I later saw these pretty faux birch candles in the Pottery Barn catalog, and wanted to try replicating the look by gluing tiny beads onto real birch bark. I have the bark, I have glass candle holders and candles, and I have the beads. This should take half an hour, tops, but I haven’t gotten around to doing it, and now another Christmas has gone by!

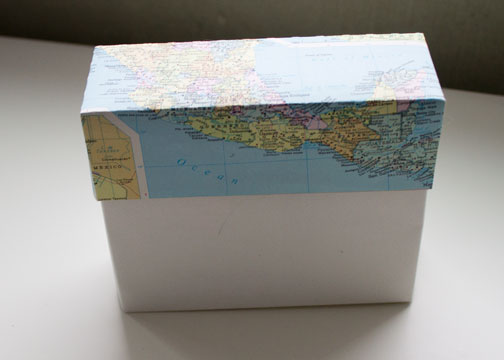
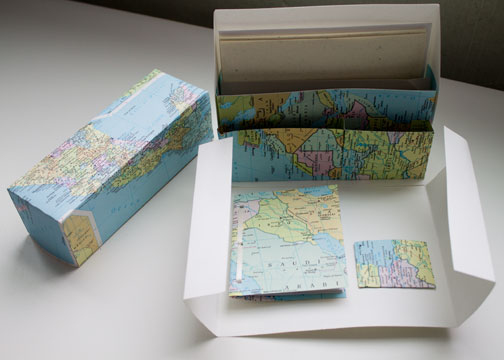
And here’s yet another project I intended to make as a Christmas gift, possibly for one of my cousin’s daughters and never finished. It was so long ago that it appears the site where I purchased cutting files for my Silhouette machine no longer exists, but I found a free version here. Those files are for the larger Cameo machines that cut 12X12 paper, so I had to split up one piece to cut it on smaller paper, I think, and then tape it back together. My idea was to make a bunch of little notecards and stickers, maybe some personalized stationery. Not sure I like how this particular box came out, but I still like the idea, and since I did purchase the files, I should make at least one at some point.
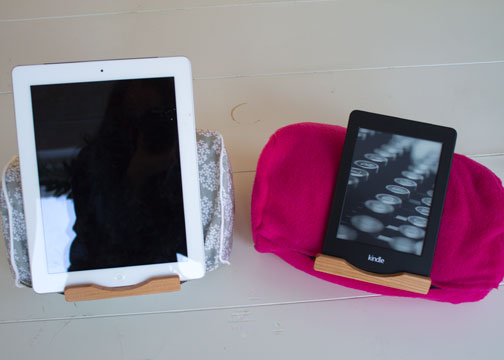
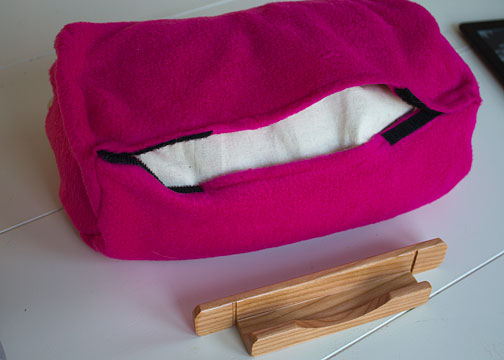
This next picture actually shows two finished projects, but I have the supplies to make two more. At least a year ago, I was looking for tutorials on making a lap pad/stand for an iPad or Kindle. I found this product, the Lap Log, and it looked so simple, basically a cylindrical pillow with a wooden insert to hold the device. What I liked about it is that you could remove the wooden insert and use the rest as a pillow, which could be very handy for traveling. I was sure I could make something similar for less money, and I got as far as buying a 5 lb. box of bucketwheat hulls for filling, but I couldn’t figure out what to use as the wooden piece. Then a few weeks ago I went back to the site and saw that they sell the wooden inserts for $8 each. So I bought four, and made two lap logs for Christmas gifts, and I have two left over. (Though probably only enough buckwheat to make one more pillow). I ended up making the pillow inserts out of plain cotton fabric, and then making covers with quilting cotton and fleece. They basically have a hemmed opening that stretches all the way across the pillow (anything smaller and it was too hard to get the pillow inside), with Velcro to close off a few inches on either side of the wooden inserts.
I really am starting to enjoy knitting, though I’m always nervous about giving away the results as gifts because I feel like I’m not quite good at it enough to produce flawless items, and I’m not sure the recipients truly appreciate how much work goes into them!
This is the Miss Marple Scarf, a free pattern on Ravelry, made for a friend. Very easy to knit, and I hope it looks cute and not too old-lady-ish.
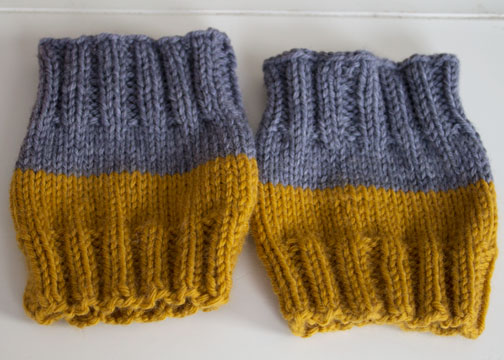
I also made her a pair of Basic Boot Cuffs. I’ve made a few pairs of these for myself, and I really like them. They look good just peeking out of the tops of my boots, and add a little bit of warmth. I like to make them with two different yarn colors so they can be flipped over, two pairs in one! The color is a bit off in the photo. The yellow is more of a goldenrod color and less pukey yellow.
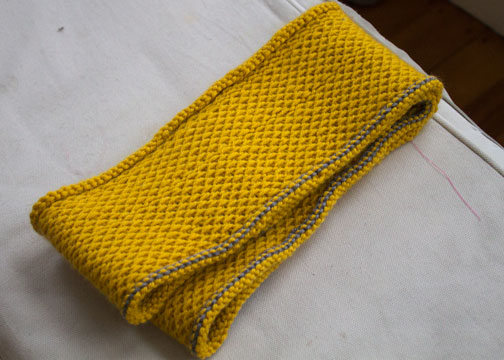
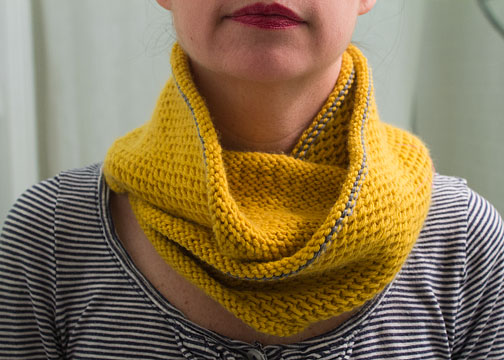
I actually used this same color scheme for another knitted item, but I didn’t think my mother-in-law would wear the boot cuffs, so I just gave her the Honey Cowl. I wish I had made this a bit wider. I ran out of the yellow yarn so I bound off in the gray, but it would’ve looked better to have the gray on both edges. I thought about trying to add some kind of crotchet border to the other edge but ran out of time.
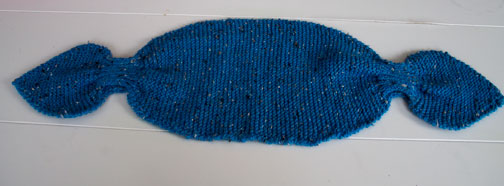
I also made a few things for my mom, including the Bandana Cowl. This was good practice for doing short rows, though I found the instructions a bit confusing. I was running out of yarn, so the top part above the short rows is shorter than called for, and the whole thing is much bigger than I thought it would be. And my mother had no idea what it was when she opened it, so who knows whether she’ll actually wear it.
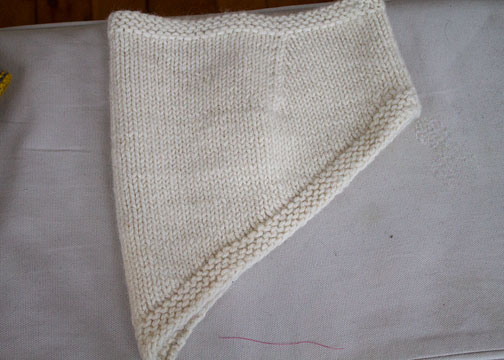
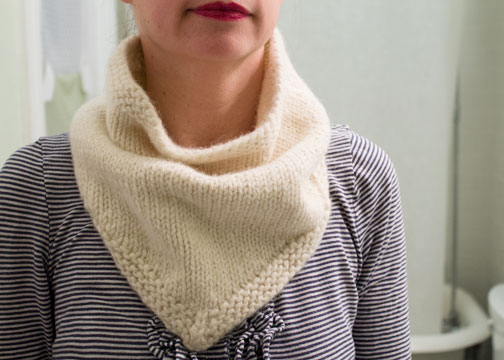
She also was confused about another knitted item I made her _ a spa wash cloth. Hmmm, what could this square cloth be wrapped around a bar of soap? Sigh.
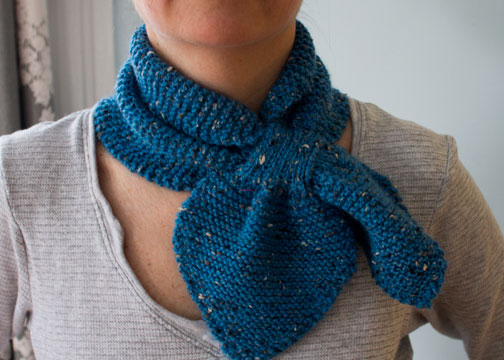
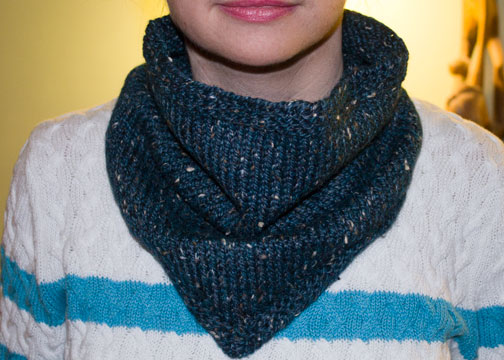
I also made a Bandana cowl for my friend Annmarie. (Sorry for the bad photo, took it at the last minute and had to use flash. The color is a much prettier dark teal.) I used smaller needles and a slightly lighter-weight yarn for this version, and I like it a lot better. I also made her some boot toppers as well, using the same yarn for one half and a similar brown tweed on the bottom.
I hope everyone had a wonderful Christmas! Ours was quite good, even though I of course did not finish all the handmade gifts I had planned. I really thought I’d have plenty of time this year because I had Fridays off during December (in exchange for working Sundays), and thus had some prime crafting time while Parker was at school. But I think the short time period between Thanksgiving and Christmas really tripped me up.
But, the gifts I did make went over pretty well, I think! Here are a few highlights, with more to come!
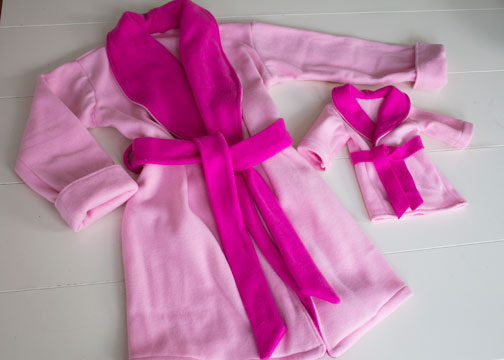
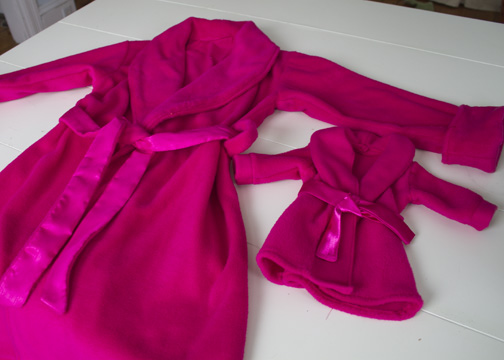
For my niece and my best friend’s daughter, I made matching robes for the girls and their American Girl dolls. I know Simplicity makes a doll robe pattern, but it was sold out at my local Jo-Ann Fabrics, so I modified a pajama pattern I found at the American Girl Playthings website, basically by making the collar rounded and making the top longer. For the big-girl versions, I used Butterick 5724.
Here’s the set I sent to my friend’s daughter:
And here’s the set for my niece:
Also for my niece, I made a doll-sized Hogwarts outfit, since she is a big Harry Potter fan. (See previous posts for her Harry Potter birthday gifts and last year’s Christmas gifts).
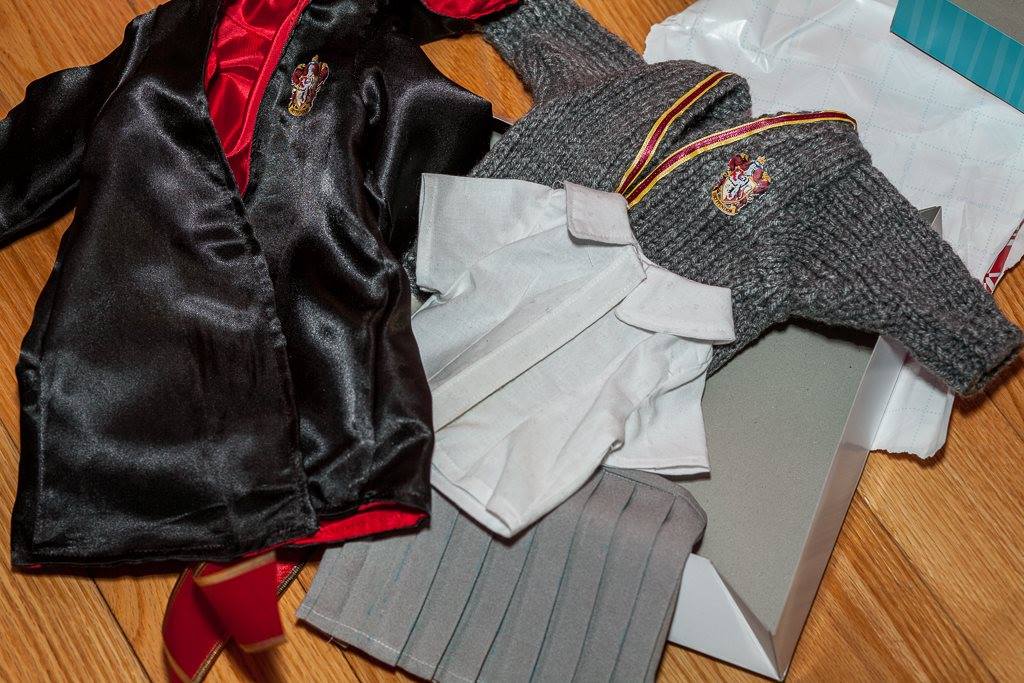
I found the robe pattern at a blog called Arts and Crafts for your American Girl Doll. I forgot how much I hate sewing with slippery fabric, in this case, cheap satin leftover from the reversible, 4-in-1 capes I made years ago. I could not figure out how to do a hidden hem on the sleeves with the lining, and I was running out of time so I just sewed it by machine,and it looks pretty messy. The sweater is a modified version of the Cardigan for 18 inch Dolls on Ravelry.com. This was my first-ever knitted sweater. It was easier than I expected, though I’m still not sure I picked up the stitches for the sleeves correctly, and I really had a tough time sewing the side seams. I just glued on the ribbon trim. The skirt is from McCalls 3900, the top is a simplified version of Butterick 4089.
First things first: The winner of my giveaway is Crystal! I’ll send you an email to get your address. Thank you to everyone else who entered.

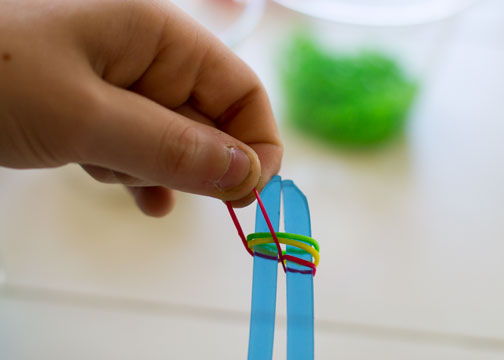
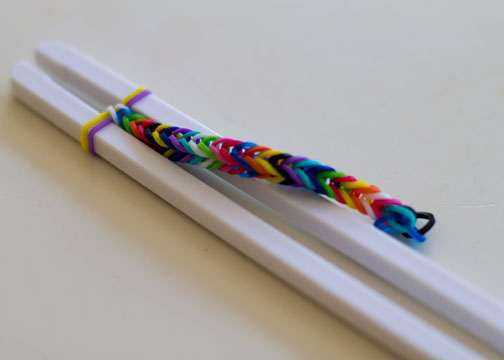
Here’s a little tutorial on how to make those rubber band bracelets that seem to be all the rage at my son’s school. I was pleasantly surprised that he has shown such an interest in making them, and while he has asked for the Rainbow Loom for Christmas, we have found an easy way to make them without the loom. His cousins showed him a method that was very similar to finger knitting, and when he wanted to set aside his bracelet in progress one day, I suggested he poke pencils through the loops. Then, inspiration struck! I got out a pair of children’s chopsticks (chopsticks that are connected at one end), and we started using those to make the bracelets instead. No more squeezed fingers!
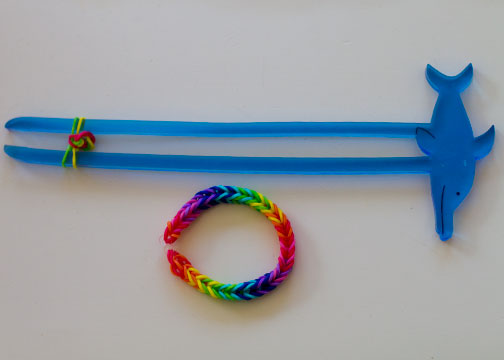
I’m sure you could just use regular pencils, but the plastic chopsticks are nice and smooth. We already had a few sets, but I also saw this set of six on Amazon.com for $12, so $2 per “loom” is a pretty good price.
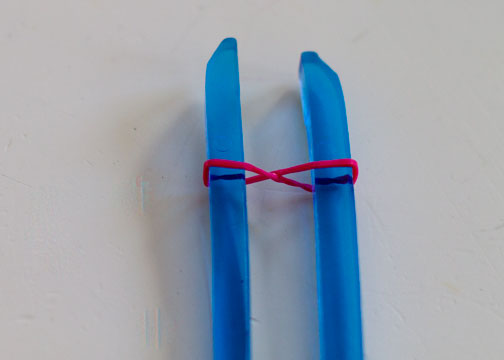 STEP 1: Slip a band around one chopstick, twist it, and slip the resulting loop over the second band. This is the only step that includes a twist.
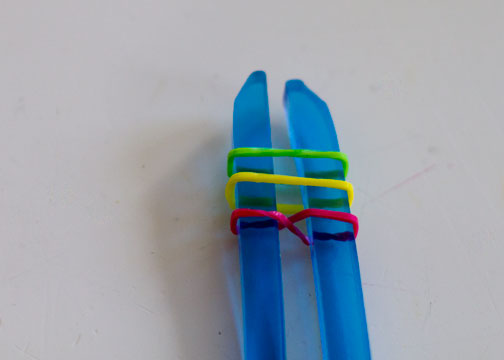 STEP 2: Slip two more bands over both chopsticks.
 STEP 3: Pull the bottom band and lift it up and over the chopstick. Repeat on other side.
 STEP 4: Add another band around both chopsticks. Continue lifting the bottom band up and over the chopsticks.
|
|