Calendar

May 2024
M T W T F S S
 12345
6789101112
13141516171819
20212223242526
2728293031  

Featured at:

craftsterBest of Craftster 2008

As seen on CraftGossip.com

Fan of:

the-long-thread-button

Lacy Keyhole Scarf


Here’s my very first knitted item! I am taking an online course taught by Stefanie Japel at Craftsy.com, and so far, it has been really great. I really like being able to watch it at my own pace, and go back to review segments if needed. I think the only drawback compared to a real, in-person class is that if you make a mistake, there’s no one there to help you! I did make a few, and ended up having to unravel several rows of stitches at various points, but I managed to salvage the project.


I’m pretty impressed that this first project combines so many different techniques, it was a great learning experience. And I think it turned out pretty cute! If you look up close, it is a little ragged, but I was pleasantly surprised when I put it on to photograph it. Parker (age 7) told me he liked it, and then said, “But you look TOO good.” I wasn’t sure how to take that! I asked him if he meant “fancy” and he said yes. So I guess I’ll take that as a compliment?

Still not sure if I like this enough to give it to someone else… or if I should just keep it for myself and figure that I will get better with future projects. This took about a week and a half to make, just working on it for a few minutes here and there… and used just one ball of yarn (Knit Picks Comfy Worsted, $2.99/ball, 75 percent pima cotton, 25 percent acrylic).


Cabbage Patch Couture

My best friend recently took her 5-year-old daughter to Babyland General to adopt a Cabbage Patch Kid for her birthday, so I wanted to make some new clothes for the new baby doll. I borrowed my own Cabbage Patch preemie doll back from my niece and bought a 1980s-era Butterick pattern for Cabbage Patch preemie doll clothes, but it turns out the new dolls sold at Babyland General are bigger _ 17″ vs. the 13″ or 14″ old dolls. But I wasn’t sure where those extra inches were, and whether the proportions were the same. After thinking it over for a few days, I came up with a way to modify the patterns to fit the larger doll. Since I didn’t have the actual doll to measure, I went to the Cabbage Patch Kid clothing website and found a picture of both the doll and a separate picture of just a basic infant sleeper laid out flat.  I copied the pictures into Photoshop and enlarged the doll until it was 17″ and then enlarged the pajamas to fit. I then printed the pictures of the pajamas, cut them out and used that sort of as a basic shape I could use to make patterns. The little dress just has two pattern pieces, the back bodice and the overlapping front bodices, plus a rectangle for the skirt. So I used the outline of the pajamas as a guide to draw shapes similar to the smaller pattern pieces, then followed the pattern’s sewing directions. The only change I made was using a double layer of fabric for the skirt, since the fabric I used is pretty thin. This actually made it easier to sew, since I didn’t have to hem the bottom edge or sides where the dress overlaps.

For the bloomers, I just used the Butterick pattern as is, and added an extra half inch to the each leg elastic and an inch to the waist.

My friend received the outfit yesterday, and she said it fits perfectly! Yay! So now I can make variations and know that they will fit. For example, I think I could just length the legs on the bloomers pattern and get rid of the elastic around the legs to make shorts or pants. It’s tempting to make a bunch of clothes for my own (I mean, my niece’s) doll, even though I know she doesn’t really play with him much. I’m sort of embarrassed to admit how old I was when I got that doll (OK, I was 11 or 12), but it was a CRAZE. Did you have Cabbage Patch Kids? I remember we were on a waiting list for months at Toys R’ Us.

I’m glad I waited to post this today. It’s cheering me up after a very long, sad night … After working all day yesterday covering the vice president’s latest trip to New Hampshire, I spent the entire night covering a terrible police shooting. I got home at 8:30 this morning. A rough start to the weekend, but I am off next week and we are going to spend it doing home improvement projects at our camp. Hopefully I’ll have some pictures to share of that next week!


Easter Already?

I’m so focused on looking ahead to summer and making stuff for the camp that Easter has snuck up on me and I didn’t even take out my old decorations, let alone make anything new this year. I’m in the middle of making another quilt (this one is for our bed at the camp), and cushions for all the porch furniture.

And I decided to learn how to knit, after spending way too much time analyzing it. On one hand, do I really need more hobbies? And won’t it be expensive?  And what would I even make? Scarves are always handy for New Hampshire winters… but I can’t really see myself making sweaters. I love some of the knitted stuffed animals I’ve seen, but Parker is getting older, and I don’t have a ton of toddlers on my gift list.

On the other hand, I am envisioning evenings at the camp, with no TV (not a big deal since we don’t have TV at home), no computer and no sewing machine. So knitting seemed like the perfect hobby to while away those hours … (My husband, by the way, has decided to teach himself wood carving/whittling so HE can have a camp hobby as well. You’d think we were 80 years old, rather than not-yet 40.)

My fellow crafting buddy Annmarie and I both signed up for Stephanie Japel’s Knit Lab class at Craftsy.com. (When I created an account, I got a welcome email that included any class for $25). So far, I really like her teaching style, and I think I’m starting to get the hang of it. But if anyone has any tips for beginners, I’d love to hear them. Particularly on yarn… is there a good, not-too-expensive yarn you really like? I really don’t want to spend a fortune.

Here are my Easter projects from past years, in case you need a last-minute project! (click on the pictures to go to the posts)

Felted Eggs

Camp Quilt

We had such crazy warm weather last week (in the 80’s, which is about 40 degrees above normal for this time of year!) that we have been dreaming a lot about returning to the summer cabin we bought last year. We bought it at the end of August so didn’t really get to enjoy it last year, given all the work it needed. But I’m glad we got all that done and can just enjoy it this summer. One thing I am NOT looking forward to is sewing cushions for the porch furniture. The previous owners left us some very large, maple furniture, probably from the 1950s or 60s, that we are going to use on the new screened-in porch, but all the cushions needed to be replaced. Of course, neither the chairs nor the sofa are a standard size so I will have to make the cushions. Ugh. Not particularly difficult sewing, but tedious and still rather pricey given the cost of foam, outdoor fabric, etc.

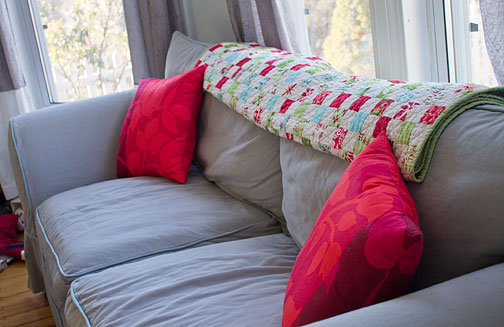
But, here is a camp project that I was much happier about. A cheerful quilt to throw over the back of the sofa. (We bought a sofa from IKEA and I dyed the white slipcover gray because the gray slipcover cost $200 more. It was not a complete success… quite a bit of it came out blotchy, so I’m hoping this quilt will cover up the worst of it).

I made this using the “Modern Workshop”  free pattern from the Oliver + S blog, and while it was quite simple given that it uses pre-cut “jelly roll” strips, the directions as written result in a HUGE amount of wasted fabric. This is what I had left over after making the quilt: (almost enough to make another entire quilt. Which I might do, but I would’ve preferred to have known ahead of time that there would be so much extra)

The problem is, the directions call for sewing each of 24 different jelly-roll strips to a 5.5″X width-of-fabric strip of white fabric, and then cutting the resulting strips into 17 2.5″-wide pieces. But there are only a few different colors where you actually need 17 sections.

So, if you’d like to make this quilt without wasting so much fabric, I made this chart to show how many time each color actually appears in the quilt. (Note: My quilt doesn’t actually look like this because I didn’t start with red as my #1 fabric, but you get the idea. If you want to have a rainbow/ombre effect, you need three shades of red, three oranges, three yellows, etc.) I did this calculation very quickly, but I THINK you only need about 2.75 yards of white fabric, and not the 4 yards called for in the directions.


Once you have all the necessary sections, you sew the sections into long strips in color order (A1-A2-A3….A8; B1-B2-B3) etc. so you end up with 27 strips. Then you follow the diagram to add pieces to the top and bottom, so the colors end up staggered. The shaded section below shows the 27 strips, the unshaded parts are where you add the other strips. (This won’t make much sense, but if you look at the original pattern, it makes more sense)

(Also, I just realized my quilt is upside down compared to this diagram. Oops!)


Since this quilt will be thrown over a sofa and used in the summer, I wanted it to be light-weight. So I used (pre-washed and dried) flannel instead of batting, which I think made it easier to quilt. I quilted lines roughly 1/4″ of an inch on either side of each long seam line. I was tempted to another line down the middle of each strip, too, but I was anxious to finish.

I find it easier to bring my sewing machine into the dining room for larger projects like this, which tends to attract my feline helpers.

Here’s Marmalade, who likes to flop down and demand belly rubs:


And even Tangerine, our eyeless, blind cat found her way onto the dining room table at one point:

Siblling Rivalry

I admit I am not much of a sports fan, but having graduated from the University of North Carolina, it is hard not to get caught up in the NCAA tournament “March Madness.”  This year, both my school and the school my twin sister attended  (Ohio University)  have made it to the Sweet 16 and are playing each other Friday night! So of course I had to make some t-shirts for Parker and my 7-year-old nephew to wear when we get together to watch the game.

I used the Silhouette flocked heat transfer material for both shirts. I didn’t have any white for the green shirt though, so I ironed the green design onto white cotton and then used light-weight fusible interfacing and stitching to applique it onto the shirt. I think the edges probably will fray a bit, but I don’t think my nephew will be too picky.

Go Tar Heels!

Babies Everywhere

I have at least five friends who are expecting babies in the next six months or so, so I definitely am going to get my money’s worth out of this adorable swaddled baby doll pattern from Adirondack Patterns. I didn’t follow the directions exactly (I bought some organic cotton fabric for the “skin” instead of using a sock as the pattern calls for) and I made a little hat by reducing this free pattern by 50 percent.

This was a very simple project. In fact, I probably spent more time fussing with the swaddling blanket than I did making the  doll. (I kept tinkering after I took this photo and I think I achieved a better wrap). I was conflicted about whether to secure the blanket with stitches or leave it loose. On one hand, the future recipients might like to wrap and unwrap their baby dolls. On the other hand, the doll has no arms or legs, so it looks kind of strange unwrapped. My compromise was to add a bit of iron-on Velcro to the flannel so it will hold together but can be taken apart at some point.

The flannel actually is cut from one of Parker’s swaddling blankets that I’ve had stuffed in a bin of fabric for almost eight years! Though I sometimes miss that chubby little baby, I do NOT miss the swaddling phase one bit!


Two down, one to go

I’m starting to think that by the time I finish slipcovering my living room furniture I will either be sick of the “new” look or my cats will have destroyed the new covers. I finally finished the second slipcover a few weeks ago, and now just have to make one for the large, very beat-up “chair and a half” on the other side of the room.

This chair is the reverse of the sofa, which is gray with blue piping. I think I like the contrast, but am not sure I still like the red cushions I made for the sofa. Maybe something lighter is in order for spring…


More Recycled Note Cards

One of my New Year’s resolutions was to start writing cards and letters to my far-flung friends instead of relying on e-mail and Facebook. I had a vague plan to write a letter to a different friend each month, and maybe include some handmade notecards to encourage them to write back (or write to someone else!) I’ve failed to carry through so far, but I finally made myself some notecards… now I just have to send them!

The nudge to actually start comes from the Silhouette Plus forum, which has been a great resource as I start using my Silhouette machine more. The forum includes monthly challenges. This month’s card challenge was to make a card using recycled material, so I made these cards using bits of newspaper, a map and an Old Navy ad. I think I like the map the best, though as a journalist, I should favor the newspaper version!

The design is inspired by this bookmark project by Patricia Zapata at A Little Hut.

Subway Art

Are you sick of so-called Subway Art yet? I admit, I am starting to tire of seeing it on so many craft blogs. But, I did try a slightly different take on it for one of my Associated Press craft stories. Instead of a list of places, house rules or inspirational words like I’ve seen elsewhere, I used amusing quotes from my friend’s four-year-old twins (that he had posted on Facebook) and gave the canvases to him as a gift.  As I mention in the article, I’m as guilty as anyone else when it comes to posting cute things my kid says on Facebook. So why not take those quotes and put them on the wall?

The article includes a brief tutorial on how I made mine, and other options if you don’t have a Silhouette machine (you could get the same look just printing the art and gluing it to a canvas). The friend I gave these to liked them so much that he wants two more!


Catnip Mice


I just realized I never shared these catnip mice I made before Christmas! My son is crazy about cats and wanted to make Christmas presents for the cats at our local animal shelter. So he helped me make these little guys.
I was surprised to see just how many tutorials there are online on making catnip mice, but in the end, I came up with my own method. I wanted a design that Parker could help sew, so I rejected versions that involved multiple pattern pieces and sewing curves.
These mice are super easy.
1) Cut a circle out of felt. I believe ours was about 8″. I used my rotary circle cutter but it would be just as easy to trace a salad plate or something.
2) Cut the circle in half in both directions, so you end up with 4 wedge shaped pieces.

3) Cut out small, ear-shaped pieces and place them on one of the wedge pieces, about an inch and a half away from the point. Sew them on by sewing a straight line that crosses over both pieces. (you could do this by hand, by I wanted to be quick, and the machine stitching is sturdy and less likely to come undone when kitties are chewing on them)
4) Fold the wedge piece in half, with the ears on the inside, and sew along the straight edges.
5) Turn the body right side out, and stuff. We used half catnip and half fiber fill.
6) Using strong thread, sewing a running stitch by hand around the opening, insert a bit of cotton twine for a tail, and pull tight to close up the opening. I made a bunch of extra stitches to make sure this part wouldn’t come undone.
Parker helped with the cutting, machine stitching and stuffing. And the mice were a big hit at the shelter (and with our kitties at home).